Play with an OpenShift PaaS using Docker

This post is based on material from Docker in Practice, available on Manning’s Early Access Program:

dip

Get Going

1) Allow any registry insecurely

This post is going to talk about playing with Kubernetes using Docker. Setting up Kubernetes can be a bit of a pain, but fortunately there’s a fast way to play with it.

To allow applications to contact the registry internal to OpenShift, you will need to start your Docker daemon allowing insecure registries. For simplicity we’re going to allow any registry to be accessed.

Change your Docker daemon configuration script

 DOCKER_OPTS="--insecure-registry 0.0.0.0/0"

or add the insecure-registry argument as above to the end of the existing uncommented DOCKER_OPTS line.

The file to change will depend on your distribution. systemd users will need to update /etc/sysconfig/docker; Ubuntu users /etc/default/docker

Once done, restart your docker daemon with eg:

sudo service docker restart

or

systemctl restart docker

2) Save some time by downloading some images in advance:

$ docker pull openshift/wildfly-8-centos

Run OpenShift

Run this:

$ docker run \
    -d \
    -v /var/run/docker.sock:/var/run/docker.sock \
    --name openshift-origin-play \
    --net=host \
    --privileged \
    dockerinpractice/openshift-origin-play start --loglevel=4 && \
docker exec -ti openshift-origin-play bash

You’re now in an OpenShift origin PaaS master and node.

Huh?

The above command’s a bit of a mouthful so let’s break it down.

docker run

Run up a container.

-d

Run the OpenShift origin server as a daemon.

 -v /var/run/docker.sock:/var/run/docker.sock

Use the docker server on the host from within the container. This allows us to run docker from within the origin container.

--name openshift-origin-play 

Give the container a name we can refer to; also, ensure that this can only be run one at a time (as each container name is unique on a host).

--net=host

Use the host’s network stack (ie don’t contain the network).

--privileged

Allow the container to run stuff with user privileged (well, we are just playing, right?)

dockerinpractice/openshift-origin-play

Use this as a base image. It’s the same as the openshift/origin image with a few things added for debugging and playing.

start &&

The default entrypoint (ie command) for this image is to run the openshift server. We pass the argument “start” to this to get the server to start up. If that’s successful…

docker exec -ti openshift-origin-play bash

we enter the container interactively (-ti) with the name we gave it early, running a bash process.
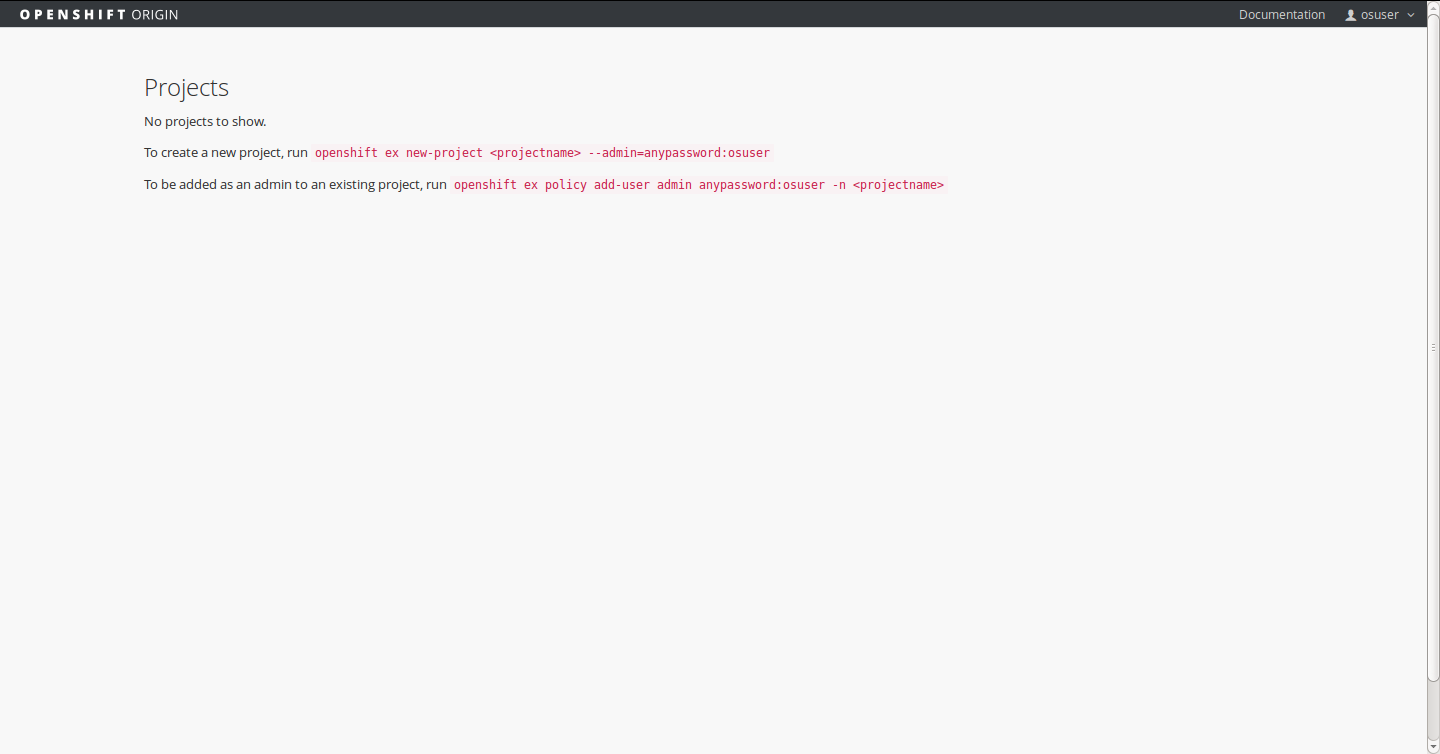
Look at the Console

Visit your OpenShift console at: https://localhost:8443/console and login with the username osuser and password dockerinpractice.

origin_1

Following the instructions there, let’s…

Start the Infrastructure

For convenience, and to avoid some troublesome issues we set a specific DNS server (we assume here that you have access to google’s DNS servers):

$ echo "nameserver 8.8.8.8" > /etc/resolv.conf

Set up the services OpenShift builds need:

$ openshift ex router --create --credentials=$KUBECONFIG
$ openshift ex registry --create --credentials=$KUBECONFIG

Create a Project

In OpenShift, a project is a namespace for a collection of applications.

$ openshift ex new-project movieplex --admin=anypassword:osuser

Now, to create an application we need to login as the admin user for the project.

$ su - osuser
$ osc login
Please provide the server URL or just <enter> to use 'https://localhost:8443': 
The server uses a certificate signed by unknown authority. You can bypass the certificate check but it will make all connections insecure.
Use insecure connections (strongly discouraged)? [y/N] y
Authenticate for "openshift"
Username: osuser
Password: 
Logged into 'https://localhost:8443' as 'osuser'.
Using project 'movieplex'.
Welcome to OpenShift v3! Use 'osc --help' for a list of commands available.
$ osc process -f https://raw.githubusercontent.com/ianmiell/javaee7-hol/master/application-template-jeebuild.json | osc create -f -
$ osc start-build jee-sample-build

And wait a long time (about 15 minutes for me on my machine).

While waiting run this:

$ osc get build
NAME TYPE STATUS POD
jee-sample-build-1 STI Pending jee-sample-build-1

The build status will change to “Running”, and eventually “Finished”.

Then you can view the application:

$ osc get service 
NAME LABELS SELECTOR IP PORT
frontend <none> name=frontend 172.30.17.59 8080
mysql <none> name=database 172.30.17.97 3306

We want to access the front end, so with the above output if you navigate to:

http://172.30.17.59:8080/movieplex7-1.0-SNAPSHOT/

you’ll see the movie app 🙂

origin_2

More to Come

There’s a lot more to this (which I’ll blog on), but this gives a taste of how scriptable deployments can be with OpenShift.

Source

The code for the example is available here:

git clone https://github.com/docker-in-practice/openshift-origin-play

Scale Your Jenkins Compute With Your Dev Team: Use Docker and Jenkins Swarm

This post is based on material from Docker in Practice, available on Manning’s Early Access Program:

dip

The Problem

At our company we had (another) problem. Our Jenkins server had apparently shrunk from what seemed like an over-spec’d monstrosity running a few jobs a day to a weedy-looking server that couldn’t cope with the hundreds of check-in-triggered jobs that were running 24/7.

Picture this:

Jenkins before

This approach clearly wouldn’t scale. Eventually servers died under the load as more and more jobs ran in parallel. Naturally this would happen when lots of check-ins were happening and the heat was on, so it was a high-visibility problem. We added more servers as a stop-gap, but that was simply putting more fingers in the dyke.

The Solution

Fortunately there’s a neat way around this problem.

Developer laptops tend to be quite powerful, so it’s only natural to consider using them. Wouldn’t it be great if you could allocate jobs to those multi-core machines that mostly lie idle while developers read Hacker News, and say “awesome” a lot?

Jenkins after

Traditionally, achieving this with VMs would be painful, and the overhead of allocating resources and running them on most machines unworkable.

With Docker it becomes easier. Docker containers can be set up that function as dynamic Jenkins slaves that are relatively unobtrusive. The Jenkins swarm plugin allows Jenkins to provision jobs to slaves dynamically.

Demo

Here’s a simple proof of concept to demonstrate the idea. You’ll need Docker installed, natch, but nothing else.

$ docker run -d \
    --name jenkins_server \
    -p 8080:8080 \
    -p 50000:50000 \
    dockerinpractice/jenkins
$ echo "Let's wait a couple of minutes for jenkins to start" && sleep 120
$ docker run -d \
    --hostname jenkins_swarm_slave_1 \
    --name jenkins_swarm_slave_1 \
    dockerinpractice/jenkins_swarm_slave

Navigate to your http://localhost:8080.

Check the swarm client has registered ok on the build executor status page.

jenkins1

Now set up a simple Jenkins job. I set one up to run “echo done” as a shell build step. Then click on “Restrict where this can be run” and apply the label “swarm”.

jenkins2

Run the job, then check the console output and you should see that ran the job on the swarm container.

jenkins3

There you have it!  A dynamic Jenkins slave running “anywhere”, making your Jenkins jobs scalable across your development effort.

Under the Hood

The default startup script for the jenkins_swarm_slave image is here.

This sets up these environment variables through defaults and introspection:

HOST_IP=$(ip route | grep ^default | awk '{print $3}')
JENKINS_SERVER=${JENKINS_SERVER:-$HOST_IP}
JENKINS_PORT=${JENKINS_PORT:-8080}
JENKINS_LABELS=${JENKINS_LABELS:-swarm}
JENKINS_HOME=${JENKINS_HOME:-$HOME}

Overriding any of these with the docker command line for your environment is trivial. For example, if your Jenkins server is at http://jenkins.internal:12345 you could run:

$ docker run -d \
    -e JENKINS_SERVER=jenkins.internal
    -e JENKINS_PORT=12345
    --name jenkins_server \
    -p 8080:8080 \
    -p 50000:50000 \
    -d dockerinpractice/jenkins_server

And to adapt this for your use case you’ll need to adapt the Dockerfile to install the software needed to run your jobs.

Final Thoughts

This may not be a solution fit for every organisation (security?), but those small-medium sized places that can implement this are the ones most likely to be feeling this pinch.

Oh, and remember that more compute is not always needed! Just because you can kick off that memory-hungry Java cluster regression test every time someone updates the README doesn’t mean you should…

It strikes us that there’s an opportunity for further work here.

  • Why not gamify your compute, so that developers that contribute more get credit?
  • Allow engineers to shut down jobs, or even make them more available at certain times of day?
  • Maybe telemetry in the client node could indicate how busy the machine its on is, and help it decide to accept the job or not?
  • Reporting on jobs that can’t complete, or find a home?

The possibilities are quite dizzying!

Docker in Practice – A Guide for Engineers

This post is based on material from Docker in Practice, available on Manning’s Early Access Program. Get 39% off with the code: 39miell

dip

We’re writing a book on Docker that’s focussed on its practical aspects.

dip

Why? James Turnbull’s “The Docker Book” is a great introduction to Docker for those that want a good grounding in the basics of Docker. And other books like Docker in Action are in the pipe that take you through the standard usage of Docker in detail.

But as busy engineers with day jobs we didn’t have the problem of getting to know Docker. We were sold on it, and wanted to know how to get this thing to useful, and fast. That meant overcoming all sorts of challenges both big and small, from the philosophical to the mundane. And in our own time to boot.

– Do we need to adopt a microservices architecture to make this work?

– Can this solve our capacity issues?

– How do we manage the way this is changing the way we work?

– Is it secure?

– How do we get the typical engineer to understand what’s going on? Where do they get lost?

– The ecosystem is overwhelming and growing every day! How do we navigate it?

– Does this replace VMs?

– What do we do about Configuration Management?

What we lacked was a coherent guide for these real-world problems. We went out and gave talks, built tools, wrote blogs, and lots of them, all with a slant of Docker’s use in the real world.

We first used Docker in anger at work in the fall of 2013. So by the time we were approached to write a book we knew what we wanted to communicate and had had over a year of real-world experience (or “the name we give to our mistakes”, as Oscar Wilde put it) to write up. And there was a happy ending – our organisation embraced Docker and saved a load of money in the process.

Writing a book on Docker is an interesting challenge as it intersects with so many different parts of the software lifecycle. So we cover a broad range of subjects.

The book is divided into four parts:

1) Docker Fundamentals

Where we give a brief introduction to Docker, its use and its architecture

2) Docker and Development

How Docker can be used by developers, some of the benefits, development patterns and pitfalls

3) Docker and DevOps

How Docker fits in with the test, continuous integration, and continuous delivery cycles

4) Docker in Production

Orchestration decisions, aspects of working systems, and how to deal with troubled waters

Each part contains discrete techniques where we discuss solutions to problems we’ve come across, or ideas to maximise the benefits of Docker adoption. But the arc of the narrative is: “Docker from desk to production”.

The book’s now available to buy on the Manning Early Access Program. You can get 50% off the book with the code ‘mlmiell’ and help to shape its content in the author forum.

This is a big technological shift, and we’re excited about being able to be part of it. We’re really interested in your experiences and views on the approach we’ve taken and solutions we’ve found.

The code for the book will be published and maintained here, and Docker images (of course!) available here.

Enjoy!

B_wac9EVEAAdGGL

This post is based on material from Docker in Practice, available on Manning’s Early Access Program. Get 39% off with the code: 39miell

dip

Fight Docker Package Drift!

Fight Docker Package Drift!

The Problem

While Dockerfiles can help enormously with pinning down the details of your build process, you can still fall victim to package drift. This is when package management changes behind the scenes, leaving you with nasty surprises to unpick.

You can specify the versions of your apt packages like this:

apt-get install package=version

but what about that package’s dependencies? And their dependencies? And so on…

“Solution”

The following command installs the given package you’re concerned with, and then spits out a Dockerfile RUN instruction with the specific versions used as dependencies. You can then place this into your Dockerfile, and if the build fails in the future, you’ll know something has changed.

The following example does this for vim, but you can change that package to whatever you like.

$ docker run imiell/get-versions vim
RUN apt-get install -y vim=2:7.4.052-1ubuntu3 vim-common=2:7.4.052-1ubuntu3 vim-runtime=2:7.4.052-1ubuntu3 libacl1:amd64=2.2.52-1 libc6:amd64=2.19-0ubuntu6.5 libc6:amd64=2.19-0ubuntu6.5 libgpm2:amd64=1.20.4-6.1 libpython2.7:amd64=2.7.6-8 libselinux1:amd64=2.2.2-1ubuntu0.1 libselinux1:amd64=2.2.2-1ubuntu0.1 libtinfo5:amd64=5.9+20140118-1ubuntu1 libattr1:amd64=1:2.4.47-1ubuntu1 libgcc1:amd64=1:4.9.1-0ubuntu1 libgcc1:amd64=1:4.9.1-0ubuntu1 libpython2.7-stdlib:amd64=2.7.6-8 zlib1g:amd64=1:1.2.8.dfsg-1ubuntu1 libpcre3:amd64=1:8.31-2ubuntu2 gcc-4.9-base:amd64=4.9.1-0ubuntu1 gcc-4.9-base:amd64=4.9.1-0ubuntu1 libpython2.7-minimal:amd64=2.7.6-8 mime-support=3.54ubuntu1.1 mime-support=3.54ubuntu1.1 libbz2-1.0:amd64=1.0.6-5 libdb5.3:amd64=5.3.28-3ubuntu3 libexpat1:amd64=2.1.0-4ubuntu1 libffi6:amd64=3.1~rc1+r3.0.13-12 libncursesw5:amd64=5.9+20140118-1ubuntu1 libreadline6:amd64=6.3-4ubuntu2 libsqlite3-0:amd64=3.8.2-1ubuntu2 libssl1.0.0:amd64=1.0.1f-1ubuntu2.8 libssl1.0.0:amd64=1.0.1f-1ubuntu2.8 readline-common=6.3-4ubuntu2 debconf=1.5.51ubuntu2 dpkg=1.17.5ubuntu5.3 dpkg=1.17.5ubuntu5.3 libnewt0.52:amd64=0.52.15-2ubuntu5 libslang2:amd64=2.2.4-15ubuntu1 vim=2:7.4.052-1ubuntu3

Take that RUN line that was output, and place in your Dockerfile, eg where you had

FROM ubuntu:14.04
RUN apt-get update && apt-get install -y vim

you would now have:

FROM ubuntu:14.04
RUN apt-get update && apt-get install -y vim=2:7.4.052-1ubuntu3 vim-common=2:7.4.052-1ubuntu3 vim-runtime=2:7.4.052-1ubuntu3 libacl1:amd64=2.2.52-1 libc6:amd64=2.19-0ubuntu6.5 libc6:amd64=2.19-0ubuntu6.5 libgpm2:amd64=1.20.4-6.1 [...]

If you try and rebuild this and something has changed, you’re far more likely to catch and identify it early. This should be particularly useful for those paranoid about any kind of changes to their builds. It won’t solve all Docker “build drift” problems, but it is a start.

Source

The source code for this is available here.

Note that this assumes a debian flavour of ubuntu:14.04. If you have a different base image, fork the repo and change the Dockerfile accordingly. Then, from the same directory:

$ docker build -t get-versions .
$ docker run get-versions vim

Help Wanted!

There are, I’m sure, plenty of improvements that could be made – maybe even scripts already in existence – to make this more robust and useful.

I’d also like to know if anyone can do this with other package managers.

If you have any ideas, do let me know: ian.miell@gmail.com

Win at 2048 with Docker and ShutIt (Redux)

This post is based on material from Docker in Practice, available on Manning’s Early Access Program. Get 39% off with the code: 39miell

dip

Steps to win at 2048

I blogged about this before, but have revisited it and made the process much easier and more robust.

1) To play 2048:

docker run -d -p 5901:5901 -p 6080:6080 --name win2048 imiell/win2048

2) Start up the vnc session:

vncviewer localhost:1

password for vnc is:

vncpass

Play for a bit.

3) When ready to “save game”:

docker tag -f my2048tag $(docker commit win2048)

Then, if you lose

4) go back to your save point with:

docker rm -f win2048
docker run -d -p 5901:5901 -p 6080:6080 --name win2048 my2048tag

and repeat steps 2) to 4) until you complete 2048!

Notes:

Command Annotations

docker run -d -p 5901:5901 -p 6080:6080 --name win2048 imiell/win2048

-d – run the container in daemon mode

-p … – publish ports related to vnc to the host

–name – give the container a name we can easily reference later

vncviewer localhost:1

Access the vncviewer on the ports  5901 and 6080.

docker tag -f my2048tag $(docker commit win2048)

The subshell (in italics) commits the files in the container to a docker image. The command returns a reference to the image that is in turn passed to the docker tag command. This forces the tag for the image to be set to my2048tag (or whatever you choose to call it.

docker rm -f win2048
docker run -d -P --name win2048 my2048tag

We must remove the container running so that the names don’t clash when we start it up again with docker run.

Build it Yourself

If you want to build the image yourself:

docker build https://raw.githubusercontent.com/ianmiell/shutit/master/library/win2048/Dockerfile

will make a local image you can tag. Code is here

Set Up a Deis (Docker-Friendly) Paas on Digital Ocean for $0.18 Per Hour in Six Easy Steps Using ShutIt

Introduction

What’s Deis?

Deis is an open source paas that is Docker-friendly.

What’s Digital Ocean?

A very cheap virtual private server provider like AWS, but simpler. Sign up here

What’s a Paas?

Platform as a service, like Heroku. Get an app deployed on demand.

What’s ShutIt?

A tool for automating complex deployments. More here

The Six Steps

1) Set up a Digital Ocean account

2) Get a personal access token by clicking on “Generate New Token”.

3) Set up a free temporary domain (if you don’t have a spare one)

I use dot.tk for this. I set up shutitdeis.tk there, for example.

Note that this script will wipe any pre-existing settings on Digital Ocean for this domain.If you create one as described above, there’s nothing to worry about.

4) Clone the repo

git clone https://github.com/ianmiell/shutit-coreos-do.git 

5) Copy and edit the Dockerfile subbing in your access token and domain

cd shutit-coreos-do/deis/dockerfile
cp Dockerfile.eg Dockerfile
sed -i 's/YOUR_ACCESS_TOKEN/<your access token here>/' Dockerfile
sed -i 's/YOUR_DOMAIN/<your domain here>/' Dockerfile

6) Run the build

docker build --no-cache .

and wait a good while. Well done! You’ve now got your own Deis cluster! Admin user is admin/admin

Use It

Instructions for use are here: http://docs.deis.io/en/v0.15.1/using_deis/

Here are some instructions to get you going. We’re going to deploy the example from here in the deis documentation:

curl -sSL http://deis.io/deis-cli/install.sh | sh
ln -fs $PWD/deis /usr/local/bin/deis  # or elsewhere on your path
deis login # <input admin/admin>
mkdir -p /tmp/example-go && cd /tmp/example-go
deis create 
#Creating application... done, created example-go
deis pull deis/example-go:latest 
#Creating build... done, v5 
curl -s http://example-go.<your domain>
#Powered by Deis

Be sure you switch it off before the hour is up or it will cost you another whole $0.18 per hour!

This method builds on the ShutIt project, and the ShutIt distro.

Any problems, please contact me below/via github issues/other social networks.

Create your own CoreOS cluster in 6 easy steps for $0.03

1) Set up a Digital Ocean account

2) Add your local ssh key

Get help with this here if needed.

3) Get a personal access token

by clicking on “Generate New Token”.

4) Clone the repo

git clone https://github.com/ianmiell/shutit-coreos-do.git 

5) Copy and edit the Dockerfile subbing in your access token

cd shutit-coreos-do/cluster_setup/dockerfile
cp Dockerfile.eg Dockerfile
sed -i 's/YOUR_ACCESS_TOKEN/<your access token here>/' Dockerfile

6) Run the build

docker build --no-cache .

Well done! You’ve now got your own CoreOS cluster! Note the IPs were output at the end, eg:

$ docker build --no-cache .
[...]
# BUILD REPORT FOR BUILD END f63c037a8591_root_1421241306.32.323376
###############################################################################

droplet_id: 3776278: ip address: 104.131.77.227
Log in with: ssh core@104.131.77.227
droplet_id: 3776289: ip address: 104.131.77.207
Log in with: ssh core@104.131.77.207
droplet_id: 3776299: ip address: 104.236.71.247
Log in with: ssh core@104.236.71.247

and now we can ssh in and run some cool CoreOS stuff:

ssh core@IP

For example, to list the machines in the cluster:

core@coreos-1 ~ $ fleetctl list-machines
MACHINE IP METADATA
1970b296... 10.132.129.104 -
6a06628e... 10.132.129.103 -
d07d7634... 10.132.129.83 -

Make sure you switch it off before the hour is up or it will cost you another whole $0.03 per hour!

This method builds on the ShutIt project, and the ShutIt distro.

Any problems, please contact me below/via github issues/other social networks.

Make Your Own Bespoke Docker Image

Make Your Own Bespoke Docker Image

Recently, a few ideas around Docker converged in my mind and led me to make my own distribution, and to enable others to do the same. Hear me out.

  • Docker is a software packaging tool (a point hammered home to me in a talk by Nic Ferrier).
  • Docker separates build from deployment.
  • Docker allows for stateless builds (and ShutIt on top of that allows for complex stateless builds)
  • Linux distributions are essentially packaging systems.
  • It’s really annoying when you get “distribution clash” between Docker builds, eg when someone writes a Dockerfile for Debian and then you want to integrate it with one written for Centos. This happens.
  • Docker has a layered filesystem, so bloat only matters if you don’t re-use layers.
  • Linux from Scratch exists (and rocks).

Putting all the above together I realised that with the advent of Docker there was less of a need to bother with traditional packaging systems at all. Why not build from source?

“Because it’s bloody hard, bloody time-consuming, and bloody painful” is the standard answer. But since you can reproduce builds at will deterministically and deploy later elsewhere, much of that difficulty can be offloaded to someone else. Add in Docker’s layered filesystem, and these other issues become easier:

  • Bug/build issue reproduction (complete audited steps).
  • More efficient space usage (build in the layers/applications you need and no more, share common layers down the dependency hierarchy).
  • Tweaking your distro from a given layer is relatively easy (just add a ShutIt module).
  • Collaboration on improvements much more effective (we’re all talking about the same thing).
  • Auditing builds (for escrow purposes, or even security purposes).
  • A common reference point for applications built in Docker.
  • Dockerfiles/ShutIt can help produce self-documenting dependencies and build steps for porting elsewhere if desired.
  • You can have more bleeding edge versions of software if you want (or configure and try older ones if preferred)
  • Automated testing is trivial (just run the build, use ShutIt’s test phase).
  • Patching is trivial (docker pull, or just hack, commit, and tag the image).

The ShutIt Docker Distro

So I built (and present) the ShutIt Distro. Based on the giant shoulders of Linux From Scratch (and Beyond Linux From Scratch) and the broad shoulders of Docker it allows you to effectively create a bespoke distribution to target the application you want, mixing different applications with a few clicks, dependencies managed and all from source.

There’s a lot of images already available here, eg:

OSQuery

rpm

node

emscripten

all built from source and with a full bash history available for reference.

Here is the sequence of commands to get from debian:jessie (docker pull imiell/sd_base) to the sd_base filesystem artifact lfs.tar.xz (see below). Empty lines indicate just hitting return to accept defaults.

Here is the sequence of commands to get from imiell/sd_base to a complete working OSQuery image.

And here’s an example of how to run the OSQuery image:

$ docker run -t -i imiell/sd_osquery
bash-4.3# osqueryi
[...]
osquery> select name, path from processes;                  
+----------+-------------------------+
| name     | path                    |
+----------+-------------------------+
| bash     |                         |
| osqueryi | /usr/local/bin/osqueryi |
+----------+-------------------------+
osquery>

Dependencies

Since the environment is so predictable and restricted, certain aspects of the dependency management process become simpler.

ShutIt allows you to produce dependency graphs of your modules with the sc (show config) sub-command. Here is a gist example.

Here’s a (big – get ready with the zoom!) image of all the dependencies for the whole of the ShutIt-Distro module “universe” as it stands today:

shutit-distro-all

and a much smaller one just for the modules needed for the OSQuery module: digraph

and NodeJS‘s much simpler one (bear in mind that the base image has a base toolchain et al in it:

node

Build Your Own Image From Source

Want to cherry pick your own image, with tools and editors to your fancy? Instructions here, raw cut and paste for Ubuntu here You’ll be presented with a sparse web interface like this:

shutit_srv1

On the left are the modules in strict dependency order. At the bottom are the more complex modules. If we take OSQuery as an example, clicking on that will cause all the dependent modules to be emboldened (this can take a few seconds if there are lots of deps):

shutit_srv2

You can add any other modules you like to your image. So if you’re an emacs user, you can tick that box and it’ll be added also. This way you can configure your own personalized image. Then scroll back up and click on “Begin Build” to kick off the build. The commands issues will be on the third pane, the log on the fourth.

When the build is complete, it can be downloaded as a tar file by clicking on “Export Container”, which you can use to load in like so:

cat downloaded.tar | docker load

which will import the image ready to run. Using the web interface is not required, but it’s obviously easier than using the command line and configs, and is a good intro to the ShutIt framework.

How the Base Toolchain Image is Produced

Initially I tried to build the entire toolchain within debian:jessie, but got myself into hot water pretty quickly. Turns out building a toolchain from scratch is quite hard. Thankfully, Automated Linux From Scratch exists, so I just used that.

That delivers an artifact called lfs.tar.xz to the filesystem which can be picked up to make a base image with this Dockerfile:

FROM scratch
ADD lfs.tar.xz /
CMD ["/bin/bash"]

The base image is then delivered to the Docker Hub here. This forms the basis for the ShutIt Distro. Here is a gist for the commands to do this yourself. Note: it takes a while!

Base Image Flow (2)

Lessons Learned

  • Sourceforge is in DR mode a lot. In fact, primary sites (eg gnu.org the other day for a couple of hours) generally are down surprisingly often.
  • You’re a complete idiot if you deviate from Linux From Scratch one iota. I did this a few times and was beaten back into line several times with brutal severity.
  • NodeJS and Ruby have surprisingly few dependencies needed to build from source.
  • apt-file is an incredibly handy tool.

Help Wanted

If you’ve read this far and are still interested, do get in touch.

There’s plenty to grep TODO 🙂

Taming Slaves with Docker and ShutIt

At our company we had a problem.

We used Jenkins for CI, but had no clear way of setting up machines in a reliable portable and reproducible way. We had centralised VMs but provisioning was slow and complex.

So we bought a big beefy development server. Everyone was happy, for it was Big and the developers did Rejoice. This server was and is maintained by a tightly-controlled puppet script.

As Jenkins use and CI takeup increased over the years we ran out of CPU and memory (thanks, Java) and explored a few options: AWS, a VMWare Virtual Private Cloud, even buying VM server boxes and handing them to teams. All had their drawbacks.

The centralised dev server approach meant a single constraint on delivery. Requirements among the temas diverged and the (centralised and harassed) IT infrastructure cost centre are reluctant to make changes for fear of helping one team and breaking another (“Why can’t we just upgrade python pleeease? What could go wrong!?”)

The system we build is monolithic and has complex dependencies, so when Docker came along we saw the opportunity to rid ourselves of this. How complex?

ShutIt has a feature (“shutit depgraph”) whereby you can output the dependency graph. Here’s the graph of the Jenkins slave server image, suitably anonymised:

jenkins_slave_anon

The dependencies go from top to bottom. At the top is the slave module, which adds a few bits onto its dependencies (the publicly available memcache and docker modules for example – yes, we run docker-within-docker to make some build processes even simpler), and those modules in turn depend on others, many of which we’ve had to tweak or maintain for our proprietary needs. Each module can be configured for specific versions that are on different real-world deployments, and used to test upgrades/fixes and the like. Doing this with standard CM tools was far more complex and difficult to maintain.

The nature of ShutIt means that it’s easy for a developer or team to add a few tweaks to this image, and regression testing can happen in the background off git hooks (or another pet project, cheapci), as all you need to know is bash; not learn and understand some declarative framework new to you.

The nature of Docker makes these slaves easy to deploy (docker pull) and portable (run on your Core i5 laptop? A provisioned VM? A Digital Ocean instance? AWS? No problem).

In the next post I plan to explain why ShutIt and Docker is a perfect configuration management fit for developers looking to manage complex build needs.

Docker – One Year On

Docker – One Year On

Introduction

It’s just over a year since I first heard of Docker, and I’ve been using it avidly one way or another ever since. A year seems like a good time to look back over what it’s done for us at $corp compared to what I’d hoped.

Docker is such a flexible technology it’s fascinating to see how different people view it and run with it. Some see it as “just a packaging tool” (as if that were not a significant thing in itself), others as a means to delivering on the microservices dream, still others as a way of saving CPU cycles at scale.

Our use case was very much about improving predictability in a sprawling decades-old codebase for the development, QA, support and testing cycles. As far as we’re concerned, it’s definitely delivered, but we’ve had to go off-piste a bit.

Main Achievements

The tl;dr is that using Docker has saved us significant amounts of time, and in addition enabled us to do things considered previously impractical. There are too many to list (available on request!) but here are some highlights:

  • Our biggest dev team (~50 devs) has switched from a “shared dev server” development paradigm, to dev’ing on local machines from Docker images built daily. Others are now following.
  • QA processes have improved significantly – for example, automated endpoint testing was a trivial addition to the daily-built dev env, complete with emails sent to the testers with logs etc..
  • We have reduced the reliance and load on a centralised IT team always torn between stability and responsiveness (“why can’t we just upgrade python on the shared servers!?”)
  • CI is now using a centralised reference image as a Jenkins slave, again reducing dependence on IT for changes. Docker’s image layering provides a neat saving in on-premise disk space also.
  • Multi-node regression testing environments can be easily deployed on an engineer’s laptop (we use Skydock for this).
  • Escrow build auditing processes which were previously onerous now come “for free”, as we phoenix-deploy dev environments.

Central to all these has been using ShutIt to enable us to encapsulate our complex build and dev needs into a single point of reference. Uptake of ShutIt  has been far better than with traditional CM tools like Puppet or Ansible, mainly due to speed-to-market rather than maturity of the tool. Relatively little training is needed to slot your changes into the ShutIt builds and regression test it; everyone can pitch in quickly.

Lessons Learned

Getting traction for a new technology with software development house like ours (500+ engineers in various locations etc) is non-trivial. Here are some lessons learned:

  • Find a few motivated people and give them space to make it work
  • Focus them on a single well-defined problem (in our case: canned dev environments)
  • This problem should have a clear benefit to the business

In terms of the Docker systems, these were some of the things we learned as we went:

  • Dockerfiles did not scale with our image need. This may be because we’re “doing it wrong” (ie our software architecture is too monolithic), but Dockerfiles were plain impractical for us, so we effectively dropped them in favour of ShutIt
  • Having pre-built vanilla base images were very useful in getting traction. Being able to hand people a useful and up-to-date image to start working on was seen as a win. A monthly cadence for the base image worked for us, while dailies were essential for the development team.
  • Building on this known base has facilitated several projects that otherwise may have taken longer to get going.
  • The Docker community is very strong and very useful – without Jerome Petazzioni‘s blogs and help on Docker mailing lists we’d have been stymied a few times.
  • Running your containers within a VM can help reduce nerves elsewhere in your business about security beyond isolation, or managing shared compute resource (until that space matures in the Docker ecosystem).
  • Managing your own registry so that people can play with it is a good idea if you want privacy, but make sure you have a plan for when the disk space usage blows up!

Future

As Docker usage grows throughout or organisation there are several things we have our eyes on over the horizon.

  • CoreOS looks like a very promising technology for managing Docker resources, and we’re playing with this very informally
  • Enterprise support is something we’ve explored, but since we’ve not gone near live with this yet we’ve not pursued it. I’d be interested to know what people’s experience with it is though

Over to You

Are your experiences with getting Docker out there similar, or completely different? I’d be delighted to hear from you (@ianmiell / ian.miell@gmail.com)