git log – the Good Parts

If you’re managing a complex git codebase with multiple developers, then you may well be using a tool like GitHub or BitBucket to delve into the history and figure out branch and merge issues.

These GUIs are great for providing a nice user interface for managing pull requests and simple histories and the like, but when the workflow SHTF there’s no substitute for using git log and its relatively little-known flags to really dig into the situation.

You’re going to run through this with me so that I know you’ve got it. Type the commands in bold to follow.

This is based on material from my book Learn Git the Hard Way, a free sample available here.

An Example Git Repository

Run this to download a fairly typical git repository that I work on:

$ git clone https://github.com/ianmiell/cookbook-openshift3-frozen
$ cd cookbook-openshift3-frozen

NB this is a copy of the original repo, ‘frozen’ here to provide stable output. 


git log

git log is the vanilla log command you are probably already familiar with:

$ git log

commit f40f8813d7fb1ab9f47aa19a27099c9e1836ed4f 
Author: Ian Miell <ian.miell@gmail.com>
Date: Sat Mar 24 12:00:23 2018 +0000

pip

commit 14df2f39d40c43f9b9915226bc8455c8b27e841b
Author: Ian Miell <ian.miell@gmail.com>
Date: Sat Mar 24 11:55:18 2018 +0000

ignore

commit 5d42c78c30e9caff953b42362de29748c1a2a350
Author: Ian Miell <ian.miell@gmail.com>
Date: Sat Mar 24 09:43:45 2018 +0000

latest

It outputs 5+ lines per commit, with date, author commit message and id. It goes in reverse time order, which makes sense for most cases, as you are mostly interested in what happened recently.

NOTE: output can vary depending on version, aliases,
and whether you are outputting to a terminal!
My version here was 2.7.4.

--oneline

Most of the time I don’t care about the author or the date, so in order that I can see more per screen, I use --oneline to only show the commit id and comment per-commit.

$ git log --oneline
ecab26a JENKINSFILE: Upgrade from 1.3 only
886111a JENKINSFILE: default is master if not a multi-branch Jenkins build
9816651 Merge branch 'master' of github.com:IshentRas/cookbook-openshift3
bf36cf5 Merge branch 'master' of github.com:IshentRas/cookbook-openshift3

​--decorate

You might want more information than that, though, like which branch was that commit on? Where are the tags?

The --decorate flag provides this.

$ git log --oneline --decorate
ecab26a (HEAD -> master, origin/master, origin/HEAD) JENKINSFILE: Upgrade from 1.3 only
886111a JENKINSFILE: default is master if not a multi-branch Jenkins build
9816651 Merge branch 'master' of github.com:IshentRas/cookbook-openshift3

More recent versions of git put this in the terminal by default, so things are improving for my fingers.

(Remember that your version might do --decorate by default fir git log when output goes to the terminal instead of a file).

--all

$ git log --oneline --decorate --all
ecab26a (HEAD -> master, origin/master, origin/HEAD) JENKINSFILE: Upgrade from 1.3 only
886111a JENKINSFILE: default is master if not a multi-branch Jenkins build
9816651 Merge branch 'master' of github.com:IshentRas/cookbook-openshift3
[...]
a1eceaf DOCS: Known issue added to upgrade docs
774a816 (origin/first_etcd, first_etcd) first_etcd
7bbe328 first_etcd check
654f8e1 (origin/iptables_fix, iptables_fix) retry added to iptables to prevent race conditions with iptables updates
e1ee997 Merge branch 'development'

Can you see what it does? If you can’t, compare it to --oneline above and dig around to figure it out.

That’s great, but what would be great is a visual representation of all those branches…

--graph

--graph gives you that visual representation, but in the terminal. While it might not look as slick as some git GUIs, it does have the benefit of being consistently viewed anywhere, and much more configurable to your specific needs.

And when you’re trying to piece together what happened on a 15-team project that doesn’t rebase, it can be essential…

$ git log --oneline --decorate --all --graph
* ecab26a (HEAD -> master, origin/master, origin/HEAD) JENKINSFILE: Upgrade from 1.3 only
* 886111a JENKINSFILE: default is master if not a multi-branch Jenkins build
* 9816651 Merge branch 'master' of github.com:IshentRas/cookbook-openshift3
|\ 
| * bf36cf5 Merge branch 'master' of github.com:IshentRas/cookbook-openshift3
| |\ 
| | * 313c03a JENKINSFILE: quick mode is INFO level only
| | * 340a8f2 JENKINSFILES: divided up into separate jobs
| | * 79e82bc JENKINSFILE: upgrades-specific Jenkinsfile added
| * | dce4c71 Add logic for additional FW for master (When not a node)
* | | d21351c Update utils/atomic
|/ / 
* | 3bd51ba Fix issue with ETCD
* | b87091a Add missing FW for HTTPD
|/ 
* a29df49 Missing (s)
* 51dff3a Fix rubocop

DON’T PANIC!

The above can be hard for the newcomer to parse, and there is little out there to guide you, but a few tips here can make it much easier to read.

The * indicates that there is a commit on the line, and the details of the commit (here the commit id, and first line of the comment) are on the right hand side.

The lines and position of the * indicate the lineage (or parentage) of each change. So, to take these three lines for example:

| * bf36cf5 Merge branch 'master' of github.com:IshentRas/cookbook-openshift3
| |\ 
| | * 313c03a JENKINSFILE: quick mode is INFO level only

The green pipes indicate that while the two changes listed here were going on, another branch had a gap between its two changes (9816651 and d21351c).

The blue line takes you to one parent of the bf36cf5 merge (what’s the commit id of the blue parent?), and the pink one goes to the other parent commit (313c03a).

It’s worth taking a bit of time to figure out what’s going on here, as it will pay dividends in a crisis later…


If you like this post, you’ll like my book Learn Git the Hard Way

It covers all this and much more in a similar style.

learngitthehardway


--simplify-by-decoration

If you’re looking at the whole history of a project and want to get a feel for its shape before diving in, you may want to see only the significant points of change (ie the lines affected by -–decorate above).

These remove any commit that wasn’t tagged, branched (ie there’s no reference). The root commit is always there too.

$ git log --oneline --decorate --all --graph --simplify-by-decoration
* ecab26a (HEAD -> master, origin/master, origin/HEAD) JENKINSFILE: Upgrade from 1.3 only
| * 774a816 (origin/first_etcd) first_etcd
|/ 
| * 654f8e1 (origin/iptables_fix) retry added to iptables to prevent race conditions with iptables updates
|/ 
* 652b1ff (origin/new-logic-upgrade) Fix issue iwith kitchen and remove sensitive output
* ed226f7 First commit

Try tagging a specific commit not listed above, and then re-run the command.

File Info

Using --oneline can be a bit sparse, so --stat can give you useful information about what changed.

The number indicates the numbers of lines that were changed, with insertions represented by a + sign, and deletions by a -. There’s no concept of a ‘change’ to a line as such: the old line is deleted, and then the new one added even if only one character changed.

$ git log --oneline --decorate --all --graph --stat
* ecab26a (HEAD -> master, origin/master, origin/HEAD) JENKINSFILE: Upgrade from 1.3 only
| Jenkinsfile.upgrades | 2 +-
| 1 file changed, 1 insertion(+), 1 deletion(-)
* 886111a JENKINSFILE: default is master if not a multi-branch Jenkins build
| Jenkinsfile.full | 2 +-
| Jenkinsfile.upgrades | 2 +-
| 2 files changed, 2 insertions(+), 2 deletions(-)

If you find --stat hard to remember, then an alternative is to use --name-only, but with that you lose the information about numbers of changes to files.

Regex on Commits

This one’s also really handy. The -G flag allows you to search for all commits and only return commits and their files whose changes include that regexp.

This one, for example, looks for changes that contain the text chef-client

$ git log -G 'chef-client' --graph --oneline --stat
...
* 22c2b1b Fix script for deploying origin
| scripts/origin_deploy.sh | 65 ++++++++++++-----------------------------------------------------
| 1 file changed, 12 insertions(+), 53 deletions(-)
... 
| * | 1a112bf - Move origin_deploy.sh in scripts folder - Enable HTTPD at startup
| | | origin_deploy.sh | 148 ----------------------------------------------------------------------------------------------------------------------------------------------------
| | | scripts/origin_deploy.sh | 148 ++++++++++++++++++++++++++++++++++++++++++++++++++++++++++++++++++++++++++++++++++++++++++++++++++++++++++++++++++++++++++++++++++++++++++++++++++++
| | | 2 files changed, 148 insertions(+), 148 deletions(-)
... 
| * | 9bb795d - Add MIT LICENCE model - Add script to auto deploy origin instance
|/ / 
| | origin_deploy.sh | 93 +++++++++++++++++++++++++++++++++++++++++++++++++++++++++++++++++++++++++++++++++++++++++++++
| | 1 file changed, 93 insertions(+)

If you’ve ever spent ages searching through git log --patch output looking for a specific change this is a godsend…

The eccentrically-named --pickaxe-all gives you information about all files that changed in the commit, rather than just the ones that matched the regexp in the commit.

$ git log -G 'chef-client' --graph --oneline --stat --pickaxe-all

Try it out!


If you like this post, you’ll like my book Learn Git the Hard Way

It covers all this and much more in a similar style.

learngitthehardway


If you liked this post, check out:

Five Key Git Concepts Explained the Hard Way

Create Your Own Git Diagrams

Ten Things I Wish I’d Known About bash

A Non-Cloud Serverless Application Pattern Using Git and Docker

Five Key Git Concepts Explained the Hard Way

If you’ve ever read a git man page, you’ll know that trying to understand git can be an intimidating experience. There’s even a git man page generator that produces joke git pages:
If <upstream> is not specified, the upstream configured in
branch.<name>.remote and branch.<name>.merge options will be used 
(see git-config(1) for details) and the --fork-point option is 
assumed. If you are currently not on any branch or if the current
branch does not have a configured upstream, the rebase will abort.
git-land-remote lands some applied remotes over the packed applied branches, and it is in various cases a possibility that a filter-branched error must prevent staged cleaning of some named stages.
One of the above extracts is a joke, one is real… So here’s five core git concepts explained. Hopefully after reading this the man pages will start to make more sense. If you’re confused by one I’ve missed, contact me to write it up for you (@ianmiell or LinkedIn). This post uses the ‘hard way‘ method to teach the concepts by having you type out the commands and think through what’s going on, without having to worry about breaking anything.

I use the same method to teach git in my book Learn Git the Hard Way.    

   learngitthehardway

1) Reference

Many will know this already, but I need to make sure you know it because it’s so fundamental. A ‘reference’ is a string that points to a commit. There are four main types of reference: HEAD, Tag, Branch, and Remote Reference

HEAD

HEAD is a special reference that always points to where the git repository is. If you checked out a branch, it’s pointed to the last commit in that branch. If you checked out a specific commit, it’s pointed to that commit. If you check out at a tag, it’s pointed to the commit of that tag. Every time you commit, the HEAD reference/pointer is moved from the old to the new commit. This happens automatically, but it’s all going on under the hood.

Tag

A tag is a reference that points to a specific commit. Whatever else happens (and unlike the HEAD), that tag will stay pointed at the commit it was originally pointed at. Branch A branch is like a tag, but will move when the HEAD moves. You can only be on one branch at a time. Type out these commands and explain what’s going on. Take your time:
$ mkdir lgthw_origin
$ cd lgthw_origin
$ git init
$ echo 1 > afile
$ git add afile
$ git commit -m firstcommit
$ git log --oneline --decorate --all --graph
$ git branch otherbranch
$ git tag firstcommittag
$ git log --oneline --decorate --all --graph
$ echo 2 >> afile
$ git commit -am secondcommit
$ git checkout otherbranch
$ git log --oneline --decorate --all --graph
$ echo 3 >> afile
$ git commit -am thirdcommit
$ git log --oneline --decorate --all --graph
Now do it again and explain to someone else what’s going on.

Remote Reference

A remote reference is a reference to code that’s from another repository. See below for more on that…

2)  ‘Detached Head’

Now that you know what HEAD is, then understanding what a ‘detached head’ is will be much easier. A ‘detached head’ is a git repository that’s checked out but has no branch associated with it. Continuing from the above listing, type this in:
$ git checkout firstcommittag
You get that scary message:
Note: checking out 'firstcommit'.

You are in 'detached HEAD' state. You can look around, make experimental
changes and commit them, and you can discard any commits you make in this
state without impacting any branches by performing another checkout.

If you want to create a new branch to retain commits you create, you may
do so (now or later) by using -b with the checkout command again. Example:

git checkout -b <new-branch-name>

HEAD is now at 1b1499c... firstcommit
but if you follow the instructions:
$ git log --oneline --decorate --all --graph
$ git checkout -b firstcommitbranch
$ git log --oneline --decorate --all --graph
you can figure out what’s going on. There was a tag, but no branch at that commit, so the HEAD was detached from a branch.

3) Remote Reference

A remote reference is a reference to a commit on another git repository.
$ cd ..
$ git clone lgthw_origin lgthw_cloned
$ cd lgthw_cloned
$ git remote -v
$ git log --oneline --decorate --all --graph
The log graph looks different doesn’t it? Compare that to the ​git log output in the other folder and think about how they differ. What word do you see multiple times in the output that you didn’t see before? The cloned repo has its own copy of the branch (firstcommitbranch) and tag (firstcommit) because that’s where the repository’s HEAD was when you cloned it.
$ git branch -a
shows all the branches visible in this repository, both local and remote. Compare that to the output of the same command in the original folder. How does it differ? Now check out your local master:
$ git checkout master
and you get a message saying:
Branch master set up to track remote branch master from origin.
Switched to a new branch 'master'
So you’ve got a local reference master which ‘tracks’ the master in the remote repository. The local reference is master, and the remote reference is origin/master. Git assumed you meant your local master to track the remote master. The two branches look the same, but they are linked only by the configuration of this repository.
$ cd ../lgthw_origin
$ git checkout master
$ echo origin_change >> afile
$ git commit -am 'Change on the origin'
Then go back to the cloned repository and fetch the changes from the origin:
$ cd ../lgthw_cloned
$ git fetch origin
$ git log --oneline --decorate --all --graph
Can you see what happened to your local master branch, and what happened to the origin’s? Why are they now separate? Note that you didn’t git pull the change. git pull does a fetch and a merge, and we don’t want to confuse here by skipping steps and making it look like magic. In fact, git pull is best avoided when you are learning git…

If you like this post, you’ll like my book Learn Git the Hard Way

It covers all this and much more in a similar style.

learngitthehardway

4) Fast Forward

Your git log graph should have looked like this:
* 90694b9 (origin/master) Change on the origin
* d20fc9a (HEAD -> master) secondcommit
| * 2e7ae21 (origin/otherbranch) thirdcommit
|/ 
* 6c14f2f (tag: firstcommittag, origin/firstcommitbranch, origin/HEAD, firstcommitbranch) firstcommit

(Your ids may differ from the above – otherwise it should be the same.)

Now, do you see how the Change on the origin commit is not branched from your local HEAD/master commit secondcommit – it’s in a ‘straight line’ from the firstcommit tag? That means that if you ‘merge’ origin/master into your local master, git can figure out that all it needs to do is move the HEAD and master reference to where the origin/master branch is and its ‘merge’ job is done.
$ git merge origin/master
$ git log --oneline --decorate --all --graph
This is all a ‘fast forward’ is: git saw that there’s no need to do any merging, it can just ‘fast forward’ the references to the point you are merging to. Or if you prefer, it just moves the pointers along rather than create a new merge commit. We just did a git pull, by the way. A git pull consists of a git fetch and a git merge. Breaking it down into these two steps helps reduce the mystery of why things can go wrong.

As an exercise, after finishing this article do the whole exercise again, but make a change to both origin/master and master and then do the fetch and merge to see what happens when a fast-forward is not possible.

5) Rebase

master and origin/master are now in sync, so now run these commands to see what a rebase is:
$ cd ../lgthw_origin 
$ git status
$ echo origin_change_rebase >> afile 
$ git commit -am 'origin change rebase' 
$ git log --oneline --decorate --all --graph 
OK so far? You’ve made a change on master on the origin repo:
$ cd ../lgthw_cloned 
$ echo cloned_change_rebase >> anewfile 
$ git add anewfile 
$ git commit -m 'cloned change rebase in anewfile' 
$ git log --oneline --decorate --all --graph 
$ git fetch origin 
$ git log --oneline --decorate --all --graph 
$ git rebase origin/master 
$ git log --oneline --decorate --all --graph
Can you see what’s happened? If not, have a close look at the last two git log outputs. That’s what a rebase is – it takes a set of commits and moves (or ‘re-bases’) them to another commit.
If you liked this post, you’ll like my book Learn Git the Hard Way It covers all this and much more in a similar style. learngitthehardway
If you liked this post, you might also like these: Create your own Git diagrams A Git Serverless Pattern Power Git Log Graphing Interactive Git Rebase and Bisect Tutorials
If you enjoyed this, then please consider buying me a coffee to encourage me to do more.

Create Your Own Git Diagrams


Ever wondered how to create your own git diagrams?

You know, the ones that look like this?

2.5.4.tex

I’ve created a Docker image to allow you to easily create your own.

$ docker pull imiell/gitdags

The git repo is here.

How To Run

The examples folder is a good place to start.

A good way to get started is to run this:

$ git clone https://github.com/ianmiell/gitdags
$ cd gitdags/examples
$ docker run -v $(pwd):/files imiell/gitdags /convert_files.sh

It will convert the *.tex (LaTeX) files into example .png images more or less complex than the one at the top.


If you want to learn more about git, read my book Learn Git the Hard Way, available at $8:

learngitthehardway


How To Make Your Own

To show you how to make your own images, let’s break down this example:

\documentclass[preview]{standalone} 
\usepackage{subcaption} 
\usepackage{gitdags} 
\begin{document} 
\begin{figure} 
  \begin{subfigure}[b]{\textwidth} 
    \centering 
    \begin{tikzpicture} 
      % Commit DAG 
      \gitDAG[grow right sep = 2em]{ 
        A -- { 
          C, 
          B, 
        } 
      }; 
      % Branch 
      \gitbranch 
        {experimental} % node name and text 
        {above=of C} % node placement 
        {C} % target 
      \gitbranch 
        {master} % node name and text 
        {below=of B} % node placement 
        {B} % target 
      % HEAD reference 
      \gitHEAD 
        {below=of master} % node placement 
        {master} % target     
    \end{tikzpicture} 
  \end{subfigure} 
\end{figure} 
\end{document}

Breaking it down into chunks, the content is framed by what is more or less boilerplate:

\documentclass[preview]{standalone} 
\usepackage{subcaption} 
\usepackage{gitdags} 
\begin{document} 
\begin{figure} 
  \begin{subfigure}[b]{\textwidth} 
  \centering 
    \begin{tikzpicture} 
[...] 
    \end{tikzpicture} 
  \end{subfigure} 
\end{figure} 
\end{document}

The subcaption package might be used by a more advanced diagram, but is not necessary to this particular one.

Next, the nodes and their links are specified in a \gitDAG section:

\gitDAG[grow right sep = 2em]{ 
   A -- { 
     C, 
     B, 
   } 
 };

The nodes are linked by a simple pair of dashes. The arrows are put in for you.

The curlies indicate a division into branches, where each line represents one line of development.

If you want to merge two branches together, then you can give them the same name, like this:

A -- { 
  C -- D, 
  B -- D, 
}

You can ‘grow’ the graph down, up, or left (as well as right, above), and make the separation larger or smaller by changing the value of 2em.

You can also ‘fade them out’ by marking them as ‘unreachable’:

[nodes=unreachable] D -- E

There are four main types of ‘external pointer’ node:

\gittag
\gitremotebranch
\gitbranch
\gitHEAD

The comments on the \gittag example here are mostly self-explanatory, and apply to all four (apart from for \gitHEAD – see below):

\gittag
  [v0p1]       % node name
  {v0.1}       % node text
  {above=of A} % node placement
  {A}          % target

The ‘target’ line refers to where the arrow points, and the ‘node placement’ line refers to where the ‘arrow node’ is positioned – it can be above=of or below=of as well as left=of or right=of.

gitHEAD ignores the node text, and just puts HEAD as the text.

Other types of node are available, but there’s no documentation on them that I can find, and literally no mention of them on GitHub anywhere outside the original source. I may try and figure them out later.

Credit

This work is based on the great work of Chris Freeman here.

And of course the original gitdags work here.

See also here for a StackOverflow discussion.

Without the above I’d have been floundering in a sea of LaTeX ignorance.


If you want to learn more about git, read my book Learn Git the Hard Way, available at $8:

learngitthehardway


If you liked this post, you might also like these:

Five Key Git Concepts Explained the Hard Way

Ten More Things I Wish I’d Known About bash

Project Management as Code with Graphviz

A Non-Cloud Serverless Application Pattern Using Git and Docker

Power ‘git log’ graphing


Five Things I Did to Change a Team’s Culture

Culture – Be Specific!

People often talk about culture being the barrier to adoption of DevOps, but they are rarely specific about this.

This was succinctly put by Charity Majors here:

CharityMajorsonTwitter.png

What to Do?

Here I discuss a few things I did to try and change a culture a few years ago in a demoralised and dysfunctional centralised IT team that I managed following the sudden departure of the IT Director.

Whether it worked or not I don’t know – you’d have to ask the team (and I was poached a couple of months after I started), but I felt a big difference pretty quickly.

1) Get on the Floor

The first thing I did was spend two weeks doing triage of incoming requests. This had a few useful effects.

  • I saw one of the two main pipelines of work into the team

The IT team was working on 1) Requests received via tickets and 2) Out-of-band requests from management (“Can you just implement a new video conferencing system? Thanks.”)

Getting a handle on 1) was the shortest path to get savings fast, so I started there. Number 2) was going to be a tougher nut to crack (mostly finding ways to say ‘no’ without getting fired). Improving 1) would help with 2).

  • I discovered the triage process was broken

The triage process was not serving its purpose. It had been given to a weaker member of staff because no-one else wanted to do it, and he was not adding any value by thinking about what was being presented to him.

I put some controls into the process from above and moved the duty around the team.

  • The ticket count dropped by 75%

I cut the open tickets by 75% in a week by deduplicating and applying simple call queue techniques to the backlog. Dropping that number didn’t drop the work by 75% (probably more like 30-40%), but it improved morale and focus significantly. I also implemented some of the techniques talked about here to reduce running costs.

  • I was seen as someone who wanted to get involved

While I had to be careful not to get into the weeds, by getting my hands dirty my credibility with the team grew.

More importantly, I could start to challenge them when I didn’t buy what they were saying. They had become used to pulling out certain excuses for failure. This wasn’t because there were not good reasons, but because they had felt ignored for so long they had stopped trying to engage openly. That culture needed to change, and being able to argue from within was critical to achieving that.

2) Move People to Other Teams

One of the things I’m absolutely certain of is that a critical feature of effective complex organisations is that they make people do all the jobs.

Only when people have seen things from all angles can they make real and effective adaptations to changing circumstances or effect real change within a complex organisation.

There’s an incredibly powerful talk here by John Allspaw where he discusses how the Navy does this to help solve the challenges aircraft carriers face:

‘So you want to understand an aircraft carrier. Imagine a busy day, and you shrink San Francisco airport to one short runway, one ramp, and one gate. Make planes take off and land at the same time at half the present time interval, rock the runway from side to side, and require that everyone that leaves returns that same day. Make sure the equipment is so close to the edge of the envelope that it’s fragile, then turn off the radar to avoid detection, impose strict controls on radios, fuel the aircraft in place with their engines running, have enemies in the air and scatter live bombs and rockets around. Now wet the whole thing down with salt water and oil and man it with 20 year olds, half of whom have never seen a plane close up. Oh, and by the way: try not to kill anyone.

(See 19 minutes in for this part of the talk.)

I made the IT staff go and sit with the developers for a couple of weeks as soon as I could. The resistance I got to this idea, even among the keen ones, was deeply surprising to me. There was a profound tendency to put others on a pedestal and fear humiliation by going outside their comfort zone.

The results, however, were immediate. Relations between teams improved dramatically, and areas of tension that had been bubbling for years got resolved as IT staff had seen things ‘from the other side’, which changed their view of why blockers should be removed, and – equally important – how they could be removed by more creative means that the ‘other side’ could not see. Once staff saw the drivers of frustration, they could implement solutions for the problem itself, and not necessarily what was being asked for.

3) Remove Bad Influences

People don’t like to talk about this, but one of the most effective ways to change culture is to fire people.

There’s a probably apocryphal story about an Orson Welles trick, where he would get a stooge to show up to work on the first day on a shoot, do something Welles didn’t want, and Welles would fire him.

The message to the crew would be unambiguous: my way, or the highway.

That’s obviously an extreme example, but I’ve seen the powerful effects of removing people who are obstructing change. That doesn’t mean you don’t follow due process, or give people clear warnings, or help them to mend their ways, but nothing sends a message of ‘I disapprove of this bad behaviour’ better than dealing with it firmly.

And check point 6 on this deck about Jeff Bezos’ mandate to change the way Amazon worked:

Anyone who doesn’t do this will be fired.

One of the first questions I generally ask myself when considering the latest attempt from on high to bring cultural change to my group is: what changes here that gets me fired?

4) Take Responsibility for Hiring

As with firing, who comes into the team is vital. I was shocked to discover that it was not considered standard to have the overall manager personally vet new hires.

While I didn’t know my Active Directory from my LDAP, I did know the difference between a bright young thing and an irritating know-all, so I took responsibility for any new hires. I deferred to my colleagues on knowledge calls, but that was not often a deciding factor either way. Far more important was how useful they would make themselves.

5) Take Responsibility for Training

There’s a great quote from Andy Grove, founder of Intel about training:

 Training is the manager’s job. Training is the highest leverage activity a manager can do to increase the output of an organization. If a manager spends 12 hours preparing training for 10 team members that increases their output by 1% on average, the result is 200 hours of increased output from the 10 employees (each works about 2000 hours a year). Don’t leave training to outsiders, do it yourself.

And training isn’t just about being in a room and explaining things to people – it’s about getting in the field and showing people how to respond to problems, how to think about things, and where they need to go next. The point is: take ownership of it.

I personally trained people in things like Git and Docker and basic programming whenever I got the chance to. This can demystify these skills and empower your staff to go further. It also sends a message about what’s important – if the boss spends time on triage, training and hiring, then they must be important.

Anything else?

What have you done to change culture in a group? Let me know.


If you want to learn more about bash, read my book Learn Bash the Hard Way, available at $5:

hero

Or my book on Docker:

Centralise Your Bash History

Why?

Have you ever run a command on one of your hosts and then wanted to retrieve it later? Then couldn’t remember where you ran it, or it’s lost from your history?

This happens to me all the time. The other day I was hunting for a command I was convinced I’d run, but wasn’t sure where it was or whether it was stored.

So I finally wrote a service that records my every command centrally.

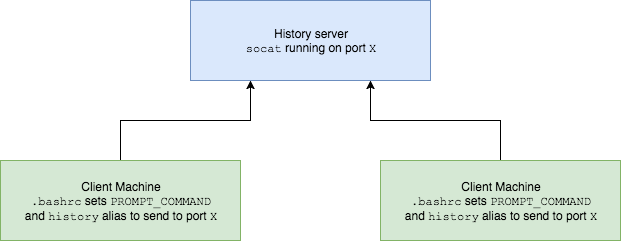
Here’s an overview of its (simple) architecture.


history-server


What?

This stores your bash history on a server in a file.

The service runs on a port of your choosing, and if you have some lines in your ~.bashrc file then it will all work seamlessly for you.

There’s some basic authentication (shared key) to prevent abuse of the service.

How?

To set up, see the README.

Requirements

Needs socat installed, and bash version 4+.

Related posts

Ten Things About Bash
Ten More Things About Bash

PS

I need help to improve this – see the README.

PPS

If you ask nicely I might host it for you, without warranty etc..


If you want to learn more about bash, read my book Learn Bash the Hard Way, available at $5:

hero

How (and Why) I Run My Own DNS Servers

Introduction

Despite my woeful knowledge of networking, I run my own DNS servers on my own websites run from home.

I achieved this through trial and error and now it requires almost zero maintenance, even though I don’t have a static IP at home.

Here I share how (and why) I persist in this endeavour.

Overview

This is an overview of the setup:

DNSSetup

This is how I set up my DNS. I:

  • got a domain from an authority (a .tk domain in my case)
  • set up glue records to defer DNS queries to my nameservers
  • set up nameservers with static IPs
  • set up a dynamic DNS updater from home

How?

Walking through step-by-step how I did it:

1) Set up two Virtual Private Servers (VPSes)

You will need two stable machines with static IP addresses.

If you’re not lucky enough to have these in your possession, then you can set one up on the cloud. I used this site, but there are plenty out there.  NB I asked them, and their IPs are static per VPS. I use the cheapest cloud VPS (1$/month) and set up debian on there.

NOTE: Replace any mention of DNSIP1 and DNSIP2 below with the first and second static IP addresses you are given.

Log on and set up root password

SSH to the servers and set up a strong root password.

2) Set up domains

You will need two domains: one for your dns servers, and one for the application running on your host.

I use dot.tk to get free throwaway domains. In this case, I might setup a myuniquedns.tk DNS domain and a myuniquesite.tk site domain.

Whatever you choose, replace your DNS domain when you see YOURDNSDOMAIN below. Similarly, replace your app domain when you see YOURSITEDOMAIN below.

3) Set up a ‘glue’ record

If you use dot.tk as above, then to allow you to manage the YOURDNSDOMAIN domain you will need to set up a ‘glue’ record.

What this does is tell the current domain authority (dot.tk) to defer to your nameservers (the two servers you’ve set up) for this specific domain. Otherwise it keeps referring back to the .tk domain for the IP.

See here for a fuller explanation.

Another good explanation is here.

To do this you need to check with the authority responsible how this is done, or become the authority yourself.

dot.tk has a web interface for setting up a glue record, so I used that.

There, you need to go to ‘Manage Domains’ => ‘Manage Domain’ => ‘Management Tools’ => ‘Register Glue Records’ and fill out the form.

Your two hosts will be called ns1.YOURDNSDOMAIN and ns2.YOURDNSDOMAIN, and the glue records will point to either IP address.

Note, you may need to wait a few hours (or longer) for this to take effect. If really unsure, give it a day.


If you like this, you might like one of my books:
Learn Bash the Hard Way

Learn Git the Hard Way
Learn Terraform the Hard Way

LearnGitBashandTerraformtheHardWay
Buy in a bundle here

4) Install bind on the DNS Servers

On a Debian machine (for example), and as root, type:

apt install bind9

bind is the domain name server software you will be running.

5) Configure bind on the DNS Servers

Now, this is the hairy bit.

There are two parts this with two files involved: named.conf.local, and the db.YOURDNSDOMAIN file.

They are both in the /etc/bind folder. Navigate there and edit these files.

Part 1 – named.conf.local

This file lists the ‘zone’s (domains) served by your DNS servers.

It also defines whether this bind instance is the ‘master’ or the ‘slave’. I’ll assume ns1.YOURDNSDOMAIN is the ‘master’ and ns2.YOURDNSDOMAIN is the ‘slave.

Part 1a – the master

On the master/ns1.YOURNDSDOMAIN, the named.conf.local should be changed to look like this:

zone "YOURDNSDOMAIN" {
 type master;
 file "/etc/bind/db.YOURDNSDOMAIN";
 allow-transfer { DNSIP2; };
};
zone "YOURSITEDOMAIN" {
 type master;
 file "/etc/bind/YOURDNSDOMAIN";
 allow-transfer { DNSIP2; };
};

zone "14.127.75.in-addr.arpa" {
 type master;
 notify no;
 file "/etc/bind/db.75";
 allow-transfer { DNSIP2; };
};

logging {
 channel query.log {
 file "/var/log/query.log";
 // Set the severity to dynamic to see all the debug messages.
 severity debug 3;
 };
category queries { query.log; };
};

The logging at the bottom is optional (I think). I added it a while ago, and I leave it in here for interest. I don’t know what the 14.127 zone stanza is about.

Part 1b – the slave

On the slave/ns2.YOURNDSDOMAIN, the named.conf.local should be changed to look like this:

zone "YOURDNSDOMAIN" {
 type slave;
 file "/var/cache/bind/db.YOURDNSDOMAIN";
 masters { DNSIP1; };
};

zone "YOURSITEDOMAIN" {
 type slave;
 file "/var/cache/bind/db.YOURSITEDOMAIN";
 masters { DNSIP1; };
};

zone "14.127.75.in-addr.arpa" {
 type slave;
 file "/var/cache/bind/db.75";
 masters { DNSIP1; };
};

Part 2 – db.YOURDNSDOMAIN

Now we get to the meat – your DNS database is stored in this file.

On the master/ns1.YOURDNSDOMAIN the db.YOURDNSDOMAIN file looks like this:

$TTL 4800
@ IN SOA ns1.YOURDNSDOMAIN. YOUREMAIL.YOUREMAILDOMAIN. (
  2018011615 ; Serial
  604800 ; Refresh
  86400 ; Retry
  2419200 ; Expire
  604800 ) ; Negative Cache TTL
;
@ IN NS ns1.YOURDNSDOMAIN.
@ IN NS ns2.YOURDNSDOMAIN.
ns1 IN A DNSIP1
ns2 IN A DNSIP2
YOURSITEDOMAIN. IN A YOURDYNAMICIP

On the slave/ns2.YOURDNSDOMAIN it’s very similar, but has ns1 in the SOA line, and the IN NS lines reversed. I can’t remember if this reversal is needed or not…:

$TTL 4800 @ IN SOA ns1.YOURDNSDOMAIN. YOUREMAIL.YOUREMAILDOMAIN. (
  2018011615 ; Serial
 604800 ; Refresh
 86400 ; Retry
 2419200 ; Expire
 604800 ) ; Negative Cache TTL
;
@ IN NS ns1.YOURDNSDOMAIN.
@ IN NS ns2.YOURDNSDOMAIN.
ns1 IN A DNSIP1
ns2IN A DNSIP2
YOURSITEDOMAIN. IN A YOURDYNAMICIP

A few notes on the above:

  • The dots at the end of lines are not typos – this is how domains are written in bind files. So google.com is written google.com.
  • The YOUREMAIL.YOUREMAILDOMAIN. part must be replaced by your own email. For example, my email address: ian.miell@gmail.com becomes ianmiell.gmail.com..  Note also that the dot between first and last name is dropped. email ignores those anyway!
  • YOURDYNAMICIP is the IP address your domain should be pointed to (ie the IP address returned by the DNS server). It doesn’t matter what it is at this point, because….

the next step is to dynamically update the DNS server with your dynamic IP address whenever it changes.

6) Copy ssh keys

Before setting up your dynamic DNS you need to set up your ssh keys so that your home server can access the DNS servers.

NOTE: This is not security advice. Use at your own risk.

First, check whether you already have an ssh key generated:

ls ~/.ssh/id_rsa

If that returns a file, you’re all set up. Otherwise, type:

ssh-keygen

and accept the defaults.

Then, once you have a key set up, copy your ssh ID to the nameservers:

ssh-copy-id root@DNSIP1
ssh-copy-id root@DNSIP2

Inputting your root password on each command.


If you like this, you might like one of my books:
Learn Bash the Hard Way

Learn Git the Hard Way
Learn Terraform the Hard Way

LearnGitBashandTerraformtheHardWay

7) Create an IP updater script

Now ssh to both servers and place this script in /root/update_ip.sh:

#!/bin/bash
set -o nounset
sed -i "s/^(.*) IN A (.*)$/1 IN A $1/" /etc/bind/db.YOURDNSDOMAIN
sed -i "s/.*Serial$/ $(date +%Y%m%d%H) ; Serial/" /etc/bind/db.YOURDNSDOMAIN
/etc/init.d/bind9 restart

Make it executable by running:

chmod +x /root/update_ip.sh

Going through it line by line:

  • set -o nounset

This line throws an error if the IP is not passed in as the argument to the script.

  • sed -i "s/^(.*) IN A (.*)$/1 IN A $1/" /etc/bind/db.YOURDNSDOMAIN

Replaces the IP address with the contents of the first argument to the script.

  • ​​​sed -i "s/.*Serial$/ $(date +%Y%m%d%H) ; Serial/" /etc/bind/db.YOURDNSDOMAIN

Ups the ‘serial number’

  • /etc/init.d/bind9 restart

Restart the bind service on the host.

8) Cron Your Dynamic DNS

At this point you’ve got access to update the IP when your dynamic IP changes, and the script to do the update.

Here’s the raw cron entry:

* * * * * curl ifconfig.co 2>/dev/null > /tmp/ip.tmp && (diff /tmp/ip.tmp /tmp/ip || (mv /tmp/ip.tmp /tmp/ip && ssh root@DNSIP1 "/root/update_ip.sh $(cat /tmp/ip)")); curl ifconfig.co 2>/dev/null > /tmp/ip.tmp2 && (diff /tmp/ip.tmp2 /tmp/ip2 || (mv /tmp/ip.tmp2 /tmp/ip2 && ssh root@192.210.238.236 "/root/update_ip.sh $(cat /tmp/ip2)"))

Breaking this command down step by step:

curl ifconfig.co 2>/dev/null > /tmp/ip.tmp

This curls a ‘what is my IP address’ site, and deposits the output to /tmp/ip.tmp

diff /tmp/ip.tmp /tmp/ip || (mv /tmp/ip.tmp /tmp/ip && ssh root@DNSIP1 "/root/update_ip.sh $(cat /tmp/ip)"))

This diffs the contents of /tmp/ip.tmp with /tmp/ip (which is yet to be created, and holds the last-updated ip address). If there is an error (ie there is a new IP address to update on the DNS server), then the subshell is run. This overwrites the ip address, and then ssh’es onto the

The same process is then repeated for DNSIP2 using separate files (/tmp/ip.tmp2 and /tmp/ip2).

Why!?

You may be wondering why I do this in the age of cloud services and outsourcing. There’s a few reasons.

It’s Cheap

The cost of running this stays at the cost of the two nameservers (24$/year) no matter  how many domains I manage and whatever I want to do with them.

Learning

I’ve learned a lot by doing this, probably far more than any course would have taught me.

More Control

I can do what I like with these domains: set up any number of subdomains, try my hand at secure mail techniques, experiment with obscure DNS records and so on.


If you like this, you might like one of my books:
Learn Bash the Hard Way

Learn Git the Hard Way
Learn Terraform the Hard Way

LearnGitBashandTerraformtheHardWay
Buy in a bundle here

If you liked this post, you might also like:

Create Your Own Git Diagrams

Ten Things I Wish I’d Known About bash

Ten More Things I Wish I’d Known About bash

Project Management as Code with Graphviz

Ten Things I Wish I’d Known Before Using Jenkins Pipelines


If you enjoyed this, then please consider buying me a coffee to encourage me to do more.


Get 39% off Docker in Practice with the code: 39miell2

Ten More Things I Wish I'd Known About bash

Intro

My previous post took off far more than I expected, so I thought I’d write another piece on less well-known bash features.

As I said before, because I felt bash is an often-used (and under-understood) technology, I ended up writing a book on it while studying it up. It’s really gratifying to know that other people think it’s important too, despite being un-hip.

A preview of the book is available here. It focusses more than these articles on ensuring you are drilled in and understand the concepts you need to take your bash usage to a higher level. This is written more for ‘fun’.

HN discussion here.

hero


1) ^x^y^

A gem I use all the time.

Ever typed anything like this?

$ grp somestring somefile
-bash: grp: command not found

Sigh. Hit ‘up’, ‘left’ until at the ‘p’ and type ‘e’ and return.

Or do this:

$ ^rp^rep^
grep 'somestring' somefile
$

One subtlety you may want to note though is:

$ grp rp somefile
$ ^rp^rep^
$ grep rp somefile

If you wanted rep to be searched for, then you’ll need to dig into the man page and use a more powerful history command:

$ grp rp somefile
$ !!:gs/rp/rep
grep rep somefile
$

I won’t try and explain this one here…


2) pushd / popd

This one comes in very handy for scripts, especially when operating within a loop.

Let’s say you’re in a for loop moving in and out of folders like this:

for d1 in $(ls -d */)
do
  # Store original working directory.
  original_wd="$(pwd)"
  cd "$d1"
  for d2 in $(ls -d */)
  do
    pushd "$d2"
    # Do something
    popd
  done
  # Return to original working directory
  cd "${original_wd}"
done

You can rewrite the above using the pushd stack like this:

for d1 in $(ls -d *)
do
  pushd "$d1"
  for d2 in $(ls  -d */)
  do
    pushd "$d2"
    # Do something
    popd
  done
  popd
done

Which tracks the folders you’ve pushed and popped as you go.

Note that if there’s an error in a pushd you may lose track of the stack and popd too many time. You probably want to set -e in your script as well (see previous post)

There’s also cd -, but that doesn’t ‘stack’ – it just returns you to the previous folder:

cd ~
cd /tmp
cd blah
cd - # Back to /tmp
cd - # Back to 'blah'
cd - # Back to /tmp
cd - # Back to 'blah' ...

3) shopt vs set

This one bothered me for a while.

What’s the difference between set and shopt?

sets we saw before, but shopts look very similar. Just inputting shopt shows a bunch of options:

$ shopt
cdable_vars    off
cdspell        on
checkhash      off
checkwinsize   on
cmdhist        on
compat31       off
dotglob        off

I found a set of answers here.

Essentially, it looks like it’s a consequence of bash (and other shells) being built on sh, and adding shopt as another way to set extra shell options.

But I’m still unsure… if you know the answer, let me know.

4) Here Docs and Here Strings

‘Here docs’ are files created inline in the shell.

The ‘trick’ is simple. Define a closing word, and the lines between that word and when it appears alone on a line become a file.

Type this:

$ cat > afile << SOMEENDSTRING
> here is a doc
> it has three lines
> SOMEENDSTRING alone on a line will save the doc
> SOMEENDSTRING
$ cat afile
here is a doc
it has three lines
SOMEENDSTRING alone on a line will save the doc
$

Notice that:

  • the string could be included in the file if it was not ‘alone’ on the line
  • the string SOMEENDSTRING is more normally END, but that is just convention

Lesser known is the ‘here string’:

$ cat > asd <<< 'This file has one line'


5) String Variable Manipulation

You may have written code like this before, where you use tools like sed to manipulate strings:

$ VAR='HEADERMy voice is my passwordFOOTER'
$ PASS="$(echo $VAR | sed 's/^HEADER(.*)FOOTER/1/')"
$ echo $PASS

But you may not be aware that this is possible natively in bash.

This means that you can dispense with lots of sed and awk shenanigans.

One way to rewrite the above is:

$ VAR='HEADERMy voice is my passwordFOOTER'
$ PASS="${VAR#HEADER}"
$ PASS="${PASS%FOOTER}"
$ echo $PASS
  • The # means ‘match and remove the following pattern from the start of the string’
  • The % means ‘match and remove the following pattern from the end of the string

The second method is twice as fast as the first on my machine. And (to my surprise), it was roughly the same speed as a similar python script.

If you want to use glob patterns that are greedy (see globbing here) then you double up:

$ VAR='HEADERMy voice is my passwordFOOTER'
$ echo ${VAR##HEADER*}

$ echo ${VAR%%*FOOTER}

$


6) ​Variable Defaults

These are very handy for knocking up scripts.

If you have a variable that’s not set, you can ‘default’ them by using this. Create a file called default.sh with these contents

#!/bin/bash
FIRST_ARG="${1:-no_first_arg}"
SECOND_ARG="${2:-no_second_arg}"
THIRD_ARG="${3:-no_third_arg}"
echo ${FIRST_ARG}
echo ${SECOND_ARG}
echo ${THIRD_ARG}

Now run chmod +x default.sh and run the script with ./default.sh first second.

Observer how the third argument’s default has been assigned, but not the first two.

You can also assign directly with ${VAR:=defaultval} (equals sign, not dash) but note that this won’t work with positional variables in scripts or functions. Try changing the above script to see how it fails.

7) Traps

The trap builtin can be used to ‘catch’ when a signal is sent to your script.

Here’s an example I use in my own cheapci script:

function cleanup() {
    rm -rf "${BUILD_DIR}"
    rm -f "${LOCK_FILE}"
    # get rid of /tmp detritus, leaving anything accessed 2 days ago+
    find "${BUILD_DIR_BASE}"/* -type d -atime +1 | rm -rf
    echo "cleanup done"                                                                                                                          
} 
trap cleanup TERM INT QUIT

Any attempt to CTRL-C, CTRL- or terminate the program using the TERM signal will result in cleanup being called first.

Be aware:

  • Trap logic can get very tricky (eg handling signal race conditions)
  • The KILL signal can’t be trapped in this way

But mostly I’ve used this for ‘cleanups’ like the above, which serve their purpose.

8) Shell Variables

It’s well worth getting to know the standard shell variables available to you. Here are some of my favourites:

RANDOM

Don’t rely on this for your cryptography stack, but you can generate random numbers eg to create temporary files in scripts:

$ echo ${RANDOM}
16313
$ # Not enough digits?
$ echo ${RANDOM}${RANDOM}
113610703
$ NEWFILE=/tmp/newfile_${RANDOM}
$ touch $NEWFILE

REPLY

No need to give a variable name for read…

$ read
my input
$ echo ${REPLY}

LINENO and SECONDS

Handy for debugging

$ echo ${LINENO}
115
$ echo ${SECONDS}; sleep 1; echo ${SECONDS}; echo $LINENO
174380
174381
116

Note that there are two ‘lines’ above, even though you used ; to separate the commands.

TMOUT

You can timeout reads, which can be really handy in some scripts

#!/bin/bash
TMOUT=5
echo You have 5 seconds to respond...
read
echo ${REPLY:-noreply}


9) Extglobs

If you’re really knee-deep in bash, then you might want to power up your globbing. You can do this by setting the extglob shell option. Here’s the setup:

shopt -s extglob
A="12345678901234567890"
B="  ${A}  "

Now see if you can figure out what each of these does:

echo "B      |${B}|"
echo "B#+( ) |${B#+( )}|"
echo "B#?( ) |${B#?( )}|"
echo "B#*( ) |${B#*( )}|"
echo "B##+( )|${B##+( )}|"
echo "B##*( )|${B##*( )}|"
echo "B##?( )|${B##?( )}|"

Now, potentially useful as it is, it’s hard to think of a situation where you’d absolutely want to do it this way. Normally you’d use a tool better suited to the task (like sed) or just drop bash and go to a ‘proper’ programming language like python.

10) Associative Arrays

Talking of moving to other languages, a rule of thumb I use is that if I need arrays then I drop bash to go to python (I even created a Docker container for a tool to help with this here).

What I didn’t know until I read up on it was that you can have associative arrays in bash.

Type this out for a demo:

$ declare -A MYAA=([one]=1 [two]=2 [three]=3)
$ MYAA[one]="1"
$ MYAA[two]="2"
$ echo $MYAA
$ echo ${MYAA[one]}
$ MYAA[one]="1"
$ WANT=two
$ echo ${MYAA[$WANT]}

Note that this is only available in bashes 4.x+.


This is based on some of the contents of my book Learn Bash the Hard Way, available at $5:

hero

Preview available here.


I also wrote Docker in Practice 

Get 39% off with the code: 39miell2


If you liked this post, you might also like these:

Ten Things I Wish I’d Known About bash

Centralise Your Bash History

How (and Why) I Run My Own DNS Servers

My Favourite Secret Weapon – strace

A Complete Chef Infrastructure on Your Laptop


Ten Things I Wish I’d Known About bash

Intro

Recently I wanted to deepen my understanding of bash by researching as much of it as possible. Because I felt bash is an often-used (and under-understood) technology, I ended up writing a book on it.

A preview is available here.

You don’t have to look hard on the internet to find plenty of useful one-liners in bash, or scripts. And there are guides to bash that seem somewhat intimidating through either their thoroughness or their focus on esoteric detail.

Here I’ve focussed on the things that either confused me or increased my power and productivity in bash significantly, and tried to communicate them (as in my book) in a way that emphasises getting the understanding right.

Enjoy!


hero

1)  `` vs $()

These two operators do the same thing. Compare these two lines:

$ echo `ls`
$ echo $(ls)

Why these two forms existed confused me for a long time.

If you don’t know, both forms substitute the output of the command contained within it into the command.

The principal difference is that nesting is simpler.

Which of these is easier to read (and write)?

    $ echo `echo \`echo \\\`echo inside\\\`\``

or:

    $ echo $(echo $(echo $(echo inside)))

If you’re interested in going deeper, see here or here.

2) globbing vs regexps

Another one that can confuse if never thought about or researched.

While globs and regexps can look similar, they are not the same.

Consider this command:

$ rename -n 's/(.*)/new$1/' *

The two asterisks are interpreted in different ways.

The first is ignored by the shell (because it is in quotes), and is interpreted as ‘0 or more characters’ by the rename application. So it’s interpreted as a regular expression.

The second is interpreted by the shell (because it is not in quotes), and gets replaced by a list of all the files in the current working folder. It is interpreted as a glob.

So by looking at man bash can you figure out why these two commands produce different output?

$ ls *
$ ls .*

The second looks even more like a regular expression. But it isn’t!

3) Exit Codes

Not everyone knows that every time you run a shell command in bash, an ‘exit code’ is returned to bash.

Generally, if a command ‘succeeds’ you get an error code of 0. If it doesn’t succeed, you get a non-zero code. 1 is a ‘general error’, and others can give you more information (eg which signal killed it, for example).

But these rules don’t always hold:

$ grep not_there /dev/null
$ echo $?

$? is a special bash variable that’s set to the exit code of each command after it runs.

Grep uses exit codes to indicate whether it matched or not. I have to look up every time which way round it goes: does finding a match or not return 0?

Grok this and a lot will click into place in what follows.

4) if statements, [ and [[

Here’s another ‘spot the difference’ similar to the backticks one above.

What will this output?

if grep not_there /dev/null
then
    echo hi
else
    echo lo
fi

grep’s return code makes code like this work more intuitively as a side effect of its use of exit codes.

Now what will this output?

a) hihi
b) lolo
c) something else

if [ $(grep not_there /dev/null) = '' ]
then
    echo -n hi
else
    echo -n lo
fi
if [[ $(grep not_there /dev/null) = '' ]]
then
    echo -n hi
else
    echo -n lo
fi

The difference between [ and [[ was another thing I never really understood. [ is the original form for tests, and then [[ was introduced, which is more flexible and intuitive. In the first if block above, the if statement barfs because the $(grep not_there /dev/null) is evaluated to nothing, resulting in this comparison:

[ = '' ]

which makes no sense. The double bracket form handles this for you.

This is why you occasionally see comparisons like this in bash scripts:

if [ x$(grep not_there /dev/null) = 'x' ]

so that if the command returns nothing it still runs. There’s no need for it, but that’s why it exists.

5) sets

Bash has configurable options which can be set on the fly. I use two of these all the time:

set -e

exits from a script if any command returned a non-zero exit code (see above).

This outputs the commands that get run as they run:

set -x

So a script might start like this:

#!/bin/bash
set -e
set -x
grep not_there /dev/null
echo $?

What would that script output?

6) ​​<()

This is my favourite. It’s so under-used, perhaps because it can be initially baffling, but I use it all the time.

It’s similar to $() in that the output of the command inside is re-used.

In this case, though, the output is treated as a file. This file can be used as an argument to commands that take files as an argument.

Confused? Here’s an example.

Have you ever done something like this?

$ grep somestring file1 > /tmp/a
$ grep somestring file2 > /tmp/b
$ diff /tmp/a /tmp/b

That works, but instead you can write:

diff <(grep somestring file1) <(grep somestring file2)

Isn’t that neater?


This is based on some of the contents of my book Learn Bash the Hard Way

hero

Preview available here.


7) Quoting

Quoting’s a knotty subject in bash, as it is in many software contexts.

Firstly, variables in quotes:

A='123'  
echo "$A"
echo '$A'

Pretty simple – double quotes dereference variables, while single quotes go literal.

So what will this output?

mkdir -p tmp
cd tmp
touch a
echo "*"
echo '*'

Surprised? I was.

8) Top three shortcuts

There are plenty of shortcuts listed in man bash, and it’s not hard to find comprehensive lists. This list consists of the ones I use most often, in order of how often I use them.

Rather than trying to memorize them all, I recommend picking one, and trying to remember to use it until it becomes unconscious. Then take the next one. I’ll skip over the most obvious ones (eg !! – repeat last command, and ~ – your home directory).

!$

I use this dozens of times a day. It repeats the last argument of the last command. If you’re working on a file, and can’t be bothered to re-type it command after command it can save a lot of work:

grep somestring /long/path/to/some/file/or/other.txt
vi !$

​​!:1-$

This bit of magic takes this further. It takes all the arguments to the previous command and drops them in. So:

grep isthere /long/path/to/some/file/or/other.txt
egrep !:1-$
fgrep !:1-$

The ! means ‘look at the previous command’, the : is a separator, and the 1 means ‘take the first word’, the - means ‘until’ and the $ means ‘the last word’.

Note: you can achieve the same thing with !*. Knowing the above gives you the control to limit to a specific contiguous subset of arguments, eg with !:2-3.

:h

I use this one a lot too. If you put it after a filename, it will change that filename to remove everything up to the folder. Like this:

grep isthere /long/path/to/some/file/or/other.txt
cd !$:h

which can save a lot of work in the course of the day.

9) startup order

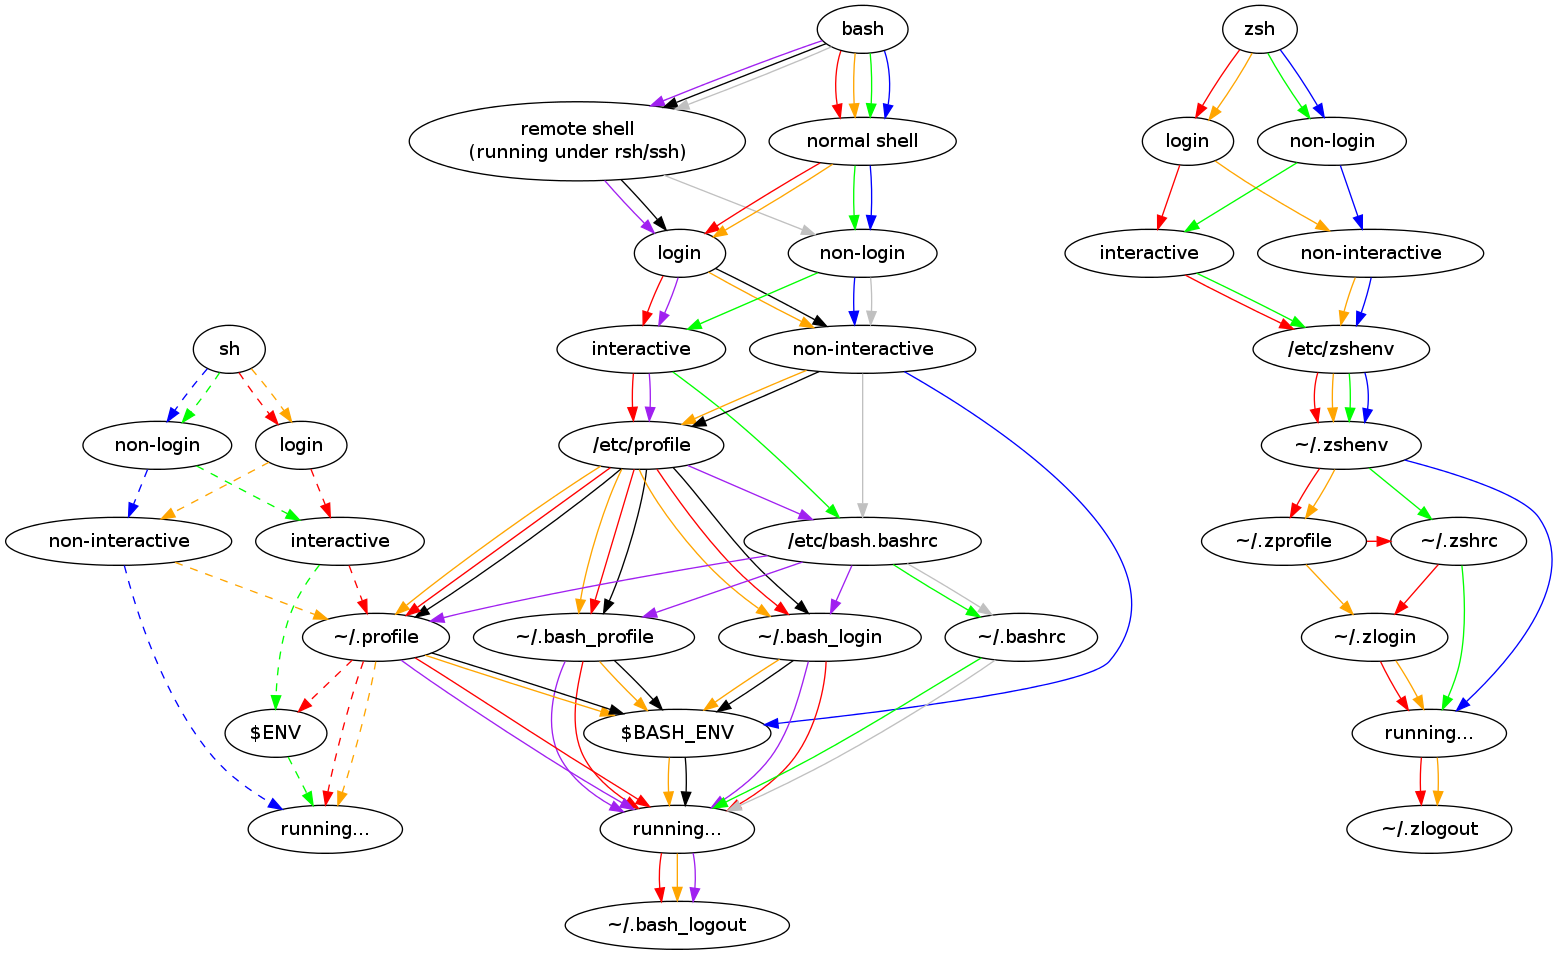
The order in which bash runs startup scripts can cause a lot of head-scratching. I keep this diagram handy (from this great page):

shell-startup-actual

It shows which scripts bash decides to run from the top, based on decisions made about the context bash is running in (which decides the colour to follow).

So if you are in a local (non-remote), non-login, interactive shell (eg when you run bash itself from the command line), you are on the ‘green’ line, and these are the order of files read:

/etc/bash.bashrc
~/.bashrc

[bash runs, then terminates]

~/.bash_logout

This can save you a hell of a lot of time debugging.

10) getopts (cheapci)

If you go deep with bash, you might end up writing chunky utilities in it. If you do, then getting to grips with getopts can pay large dividends.

For fun, I once wrote a script called cheapci which I used to work like a Jenkins job.

The code here implements the reading of the two required, and 14 non-required arguments. Better to learn this than to build up a bunch of bespoke code that can get very messy pretty quickly as your utility grows.


If you enjoyed this, then please consider buying me a coffee to encourage me to do more.


Project Management as Code with Graphviz

tl;dr

My team and I have been using graphviz and git to perform project management tasks.

It has numerous benefits, including:

  • Asynchronous project updates (ie fewer meetings)
  • Improved updates for users
  • Visualisation of complexity of project for stakeholders and team
  • Assumptions challenged. Progress can be measured using git itself (eg log)

HackerNews Discussion here


Background

Recently I’ve had to take on some project management tasks, managing engineering for a relatively large-scale project in a large enterprise covering a wide variety of use cases and demands.

One of the biggest challenges was how to express the dependencies that needed to be overcome to get the business outcomes the stakeholders wanted. Cries of ‘we just want x’ were answered by me with varying degrees of quality repeatedly, and generally left the stakeholders unsatisfied.

Being a software engineer – and not a project manager – by background or training, I naturally used graphviz instead to create dependency diagrams, and git to manage them.

The examples here are in source here and I welcome PRs and are based on the ‘project’ of preparing for a holiday.

Simple

We start with a simple graph with a couple of dependencies:

digraph G {
 "Enjoy Holiday" -> "Book tickets"
 "Enjoy Holiday" -> "Pack suitcase night before"
 "Pack suitcase night before" -> "Buy guide book"
 "Pack suitcase night before" -> "Buy electric converter"
}

The emboldening is mine for illustration; the file is plain text.

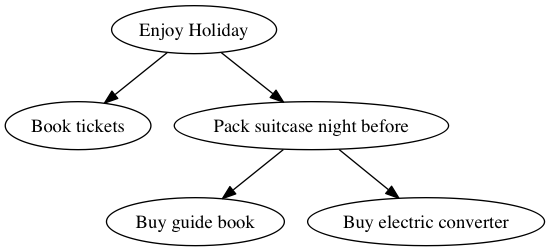
This file can be saved as simple.gv (.gv is for ‘graphviz’) and will generate this graph as a .png if you run dot -Tpng simple.gv > simple.png:

simple

Looking closer at simple.gv:

digraph – Tells graphviz that this is a directed graph, ie the relationships have a direction, indicated by the -> arrows. The arrow can be read as ‘depends on’.

Enjoy Holiday is the name of a node. Whenever this node is referenced in future it is the ‘same’ node. In the case of Pack suitcase the night before you can see that two nodes depend on it, and it depends on one. These relationships are expressed through the arrows in the file.

The dot program is part of the graphviz package. Other commands include neato, circo and others. Check man dot to read more about them.

This shows how easy it is to create a simple graph from a text file easily stored in git.

Layouts

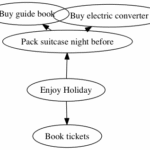
That top-down layout can be a bit restrictive to some eyes. If so, you can change the layout by using another command in the graphviz package. For example, running neato -Tpng simple.gv > simple.png produces this graph:

simple_undirected

Note how:

  • Enjoy holiday is now nearer the ‘centre’ of the graph
  • The nodes are overlapping (we’ll deal with this later)
  • The arrows have shortened (we’ll deal with this later too)

If you’re fussy about your diagrams you can spend a lot of time fiddling with them like this, so it’s useful to get a feel for what the different commands do.


If you like this post, you might like my books  Learn Git the Hard Way, Learn Bash the Hard Way or Docker in Practice

learngitthehardway

hero


Get 39% off Docker in Practice with the code: 39miell2


Colours

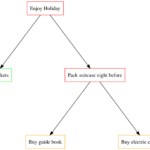
We can get more project information into a node by colorizing the nodes. I do this with a simple scheme of:

  • green = done
  • orange = in progress
  • red = not started

Here’s an updated .gv file:

digraph G { 
 "EH" [label="Enjoy Holiday",color="red"] 
 "BT" [label="Book tickets",color="green"] 
 "PSNB" [label="Pack suitcase night before",color="red"] 
 "BGB" [label="Buy guide book",color="orange"] 
 "BEC" [label="Buy electric converter",color="orange"] 
 
 "EH" -> "BT" 
 "EH" -> "PSNB" 
 "PSNB" -> "BGB" 
 "PSNB" -> "BEC" 
}

Running the command

dot -Tpng simple_colors.gv > simple_colors.png

on this results in this graph:

simple_colors

Two things have changed here. Referring to the full description of the node can get tiresome, so ‘Enjoy holiday’ has been referenced with ‘EH’, and associated with a ‘label’, and ‘color’.

"EH" [label="Enjoy Holiday",color="red"]

The nodes are defined in this way at the top, and then referred to with their relationships at the end. All sorts of attributes are available.

Nodes

Similarly, you can change the attributes of nodes in the graph, and their relationships in code.

I find that with a complex graph with some text in each node, a rectangular node makes for better  layouts. Also, I like to specify the distance between nodes, and prevent them from overlapping (two ‘problems’ we saw before).

digraph G { 
 ranksep=2.0 
 nodesep=2.0 
 overlap="false" 
 
 node [color="black", shape="rectangle"] 
 
 "EH" [label="Enjoy Holiday",color="red"] 
 "BT" [label="Book tickets",color="green"] 
 "PSNB" [label="Pack suitcase night before",color="red"] 
 "BGB" [label="Buy guide book",color="orange"] 
 "BEC" [label="Buy electric converter",color="orange"] 
 
 "EH" -> "BT" 
 "EH" -> "PSNB" 
 "PSNB" -> "BGB" 
 "PSNB" -> "BEC" 
}

By adding the ranksep and nodesep attributes, we can influence the layout of the graph by specifying the distance between nodes in their rank in the hierarchy, and separation between them. Similarly, overlap prevents the problem we saw earlier with overlapping nodes.

The node line specifies the characteristics of the nodes – in this case rectangular and black by default.

Running the same dot command as above results in this graph:

simple_node

which is arguably uglier than previous ones, but these changes help us as the graphs become more complex.

More Complex Graphs

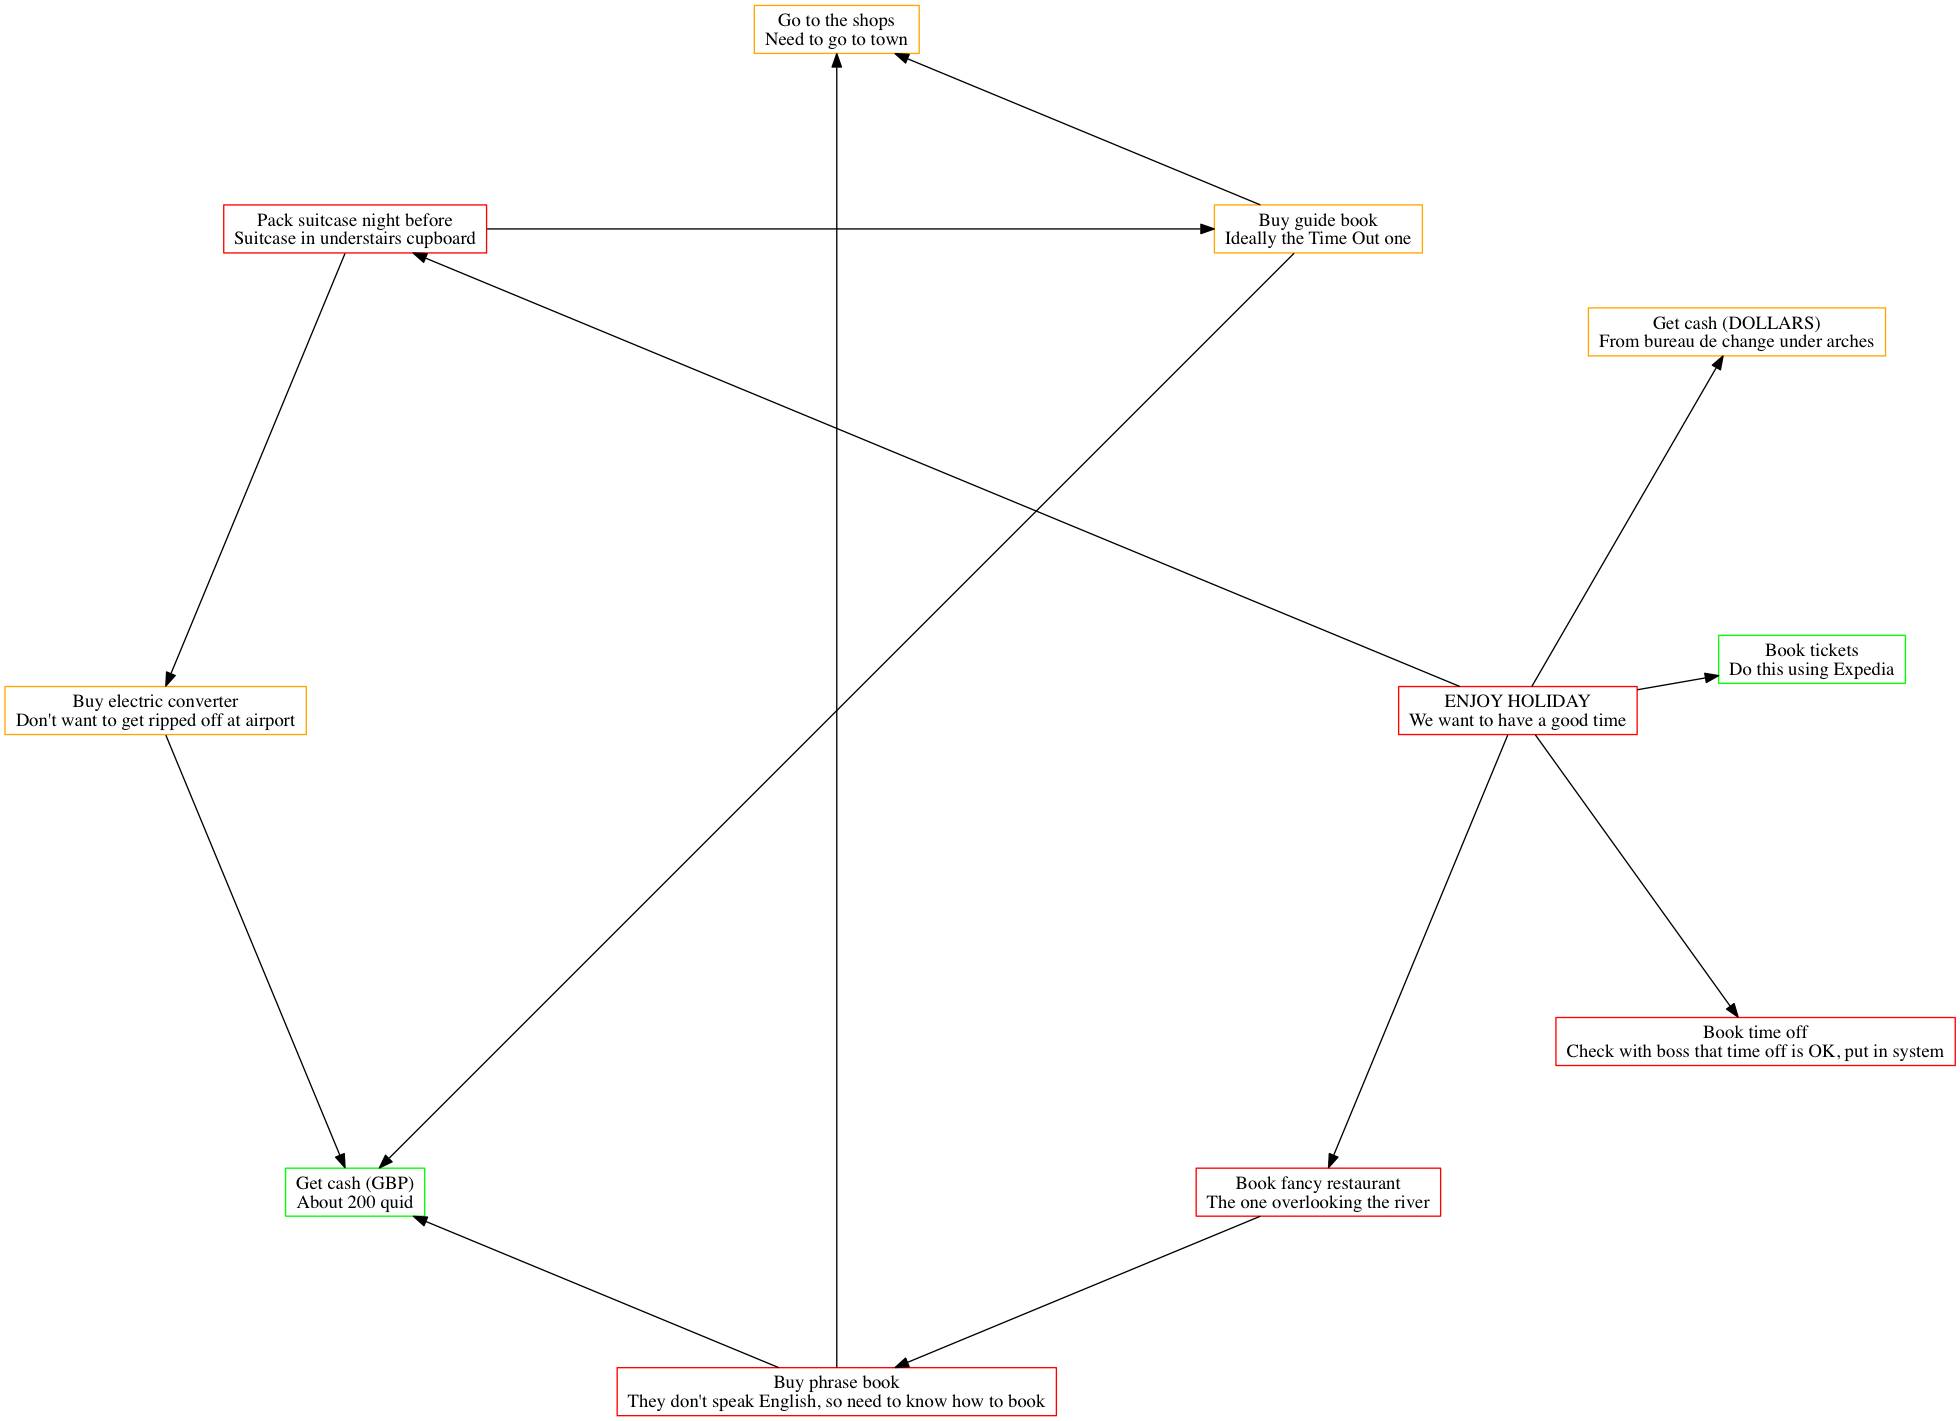
Compiling this more complex graph with dot:

digraph G {
 ranksep=2.0
 nodesep=2.0
 overlap="false"

 node [color="black", shape="rectangle"]

 "EH" [label="ENJOY HOLIDAY\nWe want to have a good time",color="red"]
 "BTOW" [label="Book time off\nCheck with boss that time off is OK, put in system",color="red"]
 "BFR" [label="Book fancy restaurant\nThe one overlooking the river",color="red"]
 "BPB" [label="Buy phrase book\nThey don't speak English, so need to know how to book",color="red"]
 "BT" [label="Book tickets\nDo this using Expedia",color="green"]
 "PSNB" [label="Pack suitcase night before\nSuitcase in understairs cupboard",color="red"]
 "BGB" [label="Buy guide book\nIdeally the Time Out one",color="orange"]
 "BEC" [label="Buy electric converter\nDon't want to get ripped off at airport",color="orange"]
 "GTS" [label="Go to the shops\nNeed to go to town",color="orange"]
 "GCG" [label="Get cash (GBP)\nAbout 200 quid",color="green"]
 "GCD" [label="Get cash (DOLLARS)\nFrom bureau de change under arches",color="orange"]
 
 "EH" -> "BT"
 "EH" -> "BFR"
 "EH" -> "BTOW"
 "BFR" -> "BPB"
 "BPB" -> "GTS"
 "BPB" -> "GCG"
 "EH" -> "PSNB"
 "EH" -> "GCD"
 "PSNB" -> "BGB"
 "BGB" -> "GTS"
 "PSNB" -> "BEC"
 "BGB" -> "GCG"
 "BEC" -> "GCG"
}

gives this graph:

complex

And with neato:

complex1

You can see the graphs look quite different depending on which layout engine/binary you use. Some may suit your purpose better than others.

Project Planning with PRs

Now that you have a feel for graphing as code, you can check these into git and share them with your team. In our team, each node represents a JIRA ticket, and shows its ID and summary.

A big benefit of this is that project updates can be asynchronous. Like many people, I work with engineers across the world, and their ability to communicate updates by this method reduces communication friction considerably.

For example, the other day we had a graph representing our next phase of work that was looking too heavy for one sprint. Rather than calling a meeting and go over each line item, I just asked him to update the graph file and raise a PR for me to review.

We then workshopped the changes over the PR, and only discussed a couple of points over the phone. Fewer meetings, and more content-rich discussions.

Surface Assumptions

Beyond fewer and more effective meetings, another benefit is the objective recording of assumptions within the team. Surprisingly often, I have discovered hidden dependencies through this method that had either not been fully understood or discussed.

It’s also surfaced further items of work required to reach the solution, which has resulted in more and more clear tickets being raised that relate to the target solution. The discipline of coding these up helps force these into the open.

Happier Stakeholders

While inside the team, the understanding of what needs to happen is clearer, stakeholders clamouring for updates are clearer on what’s blocking the outcomes they want.

Another benefit is an increased confidence in the process. There’s a document that’s readily comprehensible they can dig into if they want to find out more. But the fact that there’s a transparent graph of dependencies usually suffices to persuade people that things are under control.

Alternate Views

Finally, here are some alternate views of the same graph. We’ve already seen dot and neato. Here are the others. I’m not going to explain them technically as I’ve read the man page definitions and am none the wiser. They use words like ‘outerplanar’ and ‘force-directed’. Graph rendering is a complicated affair.

circo

complex_circo

fdp

complex_fdp

twopi

complex_twopi

patchwork

complex_patchwork

Code

Is here.

If you know more than me about graphviz and have any improvements/interesting tweaks/suggestions then please contribute.


If you like this post, you might like my books  Learn Git the Hard Way, Learn Bash the Hard Way or Docker in Practice

learngitthehardway

hero


Get 39% off Docker in Practice with the code: 39miell2