A Complete OpenShift Cluster on Vagrant, Step by Step

tl;dr

Following on from my Kubernetes post here, I have automated an OpenShift Origin cluster using the same tools.

Video

Here is a video of the whole process.

It gets (relatively) interesting later on, as a lot of the process is Vagrant starting up and yum installs failing on bad mirrors. Also, Ansible needs to be run several times for it to work (I suspect due to resource limitations, see Gotchas below).

Architecture

Here is a layout of the VMs. The host uses the landrush plugin to allow transparent DNS lookup from the host, and between boxes.

OpenShift Vagrant Cluster VM Layout

Code

The code is here:

Run Yourself

You will need at least 6.5G spare memory (maybe more) on your host. Even then it may struggle to provision in a timely way.

Do get in touch if you think you can help improve it.

Tech Used

  • Vagrant (Virtualbox)
  • ShutIt
  • Ansible

I am interested in porting to libvirt also. Please get in touch if you want to help.

Why?

One of the big problems with running OpenShift in production is the complexity of each environment. You can have test, UAT and prod environments, but sometimes you want to quickly spin up a realistic environment for development or

At that point you’re usually offered an ‘all-in-one’ or single-command setup, which, while very convenient, doesn’t represent the reality of the system you’re running elsewhere.

This is less didactic than the Kubernetes post (the steps to set up take a good while to run even if you’re using ansible…) but still has its uses.

Because this is in vagrant and is automated, it gives you a reliable, fast, and realistic representation of a real live infrastructure. This comes in very handy if you’re trying to determine the memory usage of etcd, the effect of tuning some config variables, or failover scenarios.

Gotchas

Here are some of the things I had to overcome to make this work. They’re fairly instructive:

Learn More

My book Docker in Practice:

Get 39% off with the code: 39miell

Learn Kubernetes the Hard Way (the Easy and Cheap Way)

Learn Kubernetes the Hard Way (the Easy and Cheap Way)

tl;dr

Building on Kelsey Hightower’s fantastic work exposing the internals of Kubernetes by setting up Kubernetes on public cloud providers, I’ve automated all the steps to set up a cluster on your local machine, with a walkthrough mode that takes you through step-by-step. Watch a video here (the interesting stuff happens from about 3 minutes in):

It’s free?

There is no charge as it will run on your host, but you need 2G of memory spare on your host by default.

It helps if you have Virtualbox and Vagrant already installed (works on Mac too!), although the script will try and set this up for you.

How do I run it?

Here’s the commands to run it yourself:

sudo pip install shutit
git clone --recursive https://github.com/ianmiell/shutit-k8s-the-hard-way
cd shutit-k8s-the-hard-way
./walkthrough.sh

What’s going on?

Here’s a diagram of the setup.

The host runs Vagrant and Virtualbox. Each box in the host box (the big rectangle) represents a virtual machine. There are workers (which run the pods, controllers, which run the kubernetes cluster) and a client (which has the kubernetes binaries installed on it) and a load balancer (which represents the entry point to the cluster.

Is it safe?

All work (including the Kubernetes client commands) are done within your locally-provisioned VMs, so it should won’t install crazy things to your machine or anything.

How Does it Work?

The script uses ShutIt to automate the steps to bring up the cluster and walk through the build. Contact me for more info: @ianmiell

Code

The code is here:

Help Wanted

I’m sure this can be improved, both in terms of the functionality elucidated once the cluster is up, as well as the descriptions in the notes.

Please help to contribute if you can!

Learn More

My book Docker in Practice:

Get 39% off with the code: 39miell

Terraform and Dynamic Environments

Introduction

Recently I have been playing with Terraform. It’s a lot of fun.

I had a little project that was perfect for it, but ran into a problem. Most examples of Terraform usage assume that your environments are static. So layouts like this are not uncommon:

terraform_folder/
    modules/
        myproject/main.tf
        myproject/vars.tf
    live/
        main.tf
    stage/
        main.tf
    dev/
        main.tf

Problem

All well and good, but in my project I needed to create environments on the fly, and perhaps many in existence at the same time. There was no ‘live’, just potentially hundreds of envs in use at once for a short period of time.

I also needed to keep a record of environments created and destroyed.

I researched and asked around, but couldn’t find any best practice for this, so came up with a pattern that may be useful to others.

Nothing a Shell Script Can’t Handle

In one sentence, this scheme creates a new folder on demand with a unique value which is destroyed when time is up.

The original code is elsewhere and somewhat more complex, so I put together this simple example code to illustrate the flow.

Here’s a video of it in action:


In addition to the standard main and vars files in the module, there are two scripts involved:

  • create_dynamic_environment.sh
  • destroy_dynamic_environment.sh

create_dynamic_environment.sh

  • Create a directory with a unique (well, probably) ID
  • Set up the main.tf file
  • Terraform the environment
  • (Git) add, commit and push the new directory

This script can be triggered when a new environment is required.

#!/bin/bash                                                                                                                                                                                                                                                                                                                                                                                                 

# Ensure we are in the right folder
pushd $(dirname ${BASH_SOURCE[0]})

# Create a (probably) unique ID by concatenating two random 
# values (RANDOM is a variable inherent to bash), with the day of year 
# as a suffix.
ID="dynamic_environment_${RANDOM}${RANDOM}_$(date +%j)"

# Create the terraform folder.
mkdir -p ${ID}
pushd ${ID}
cat > main.tf << END
module "dynamicenv" {
  source             = "../modules/dynamicenv"
  dynamic_env_id     = "${ID}"
}
END

# Terraform ahoy!
terraform get
terraform plan
terraform apply

popd

# Record the creation in git and push. Assumes keys set up.
git add ${ID}
git commit -am "${ID} environment added"
git push
popd         

destroy_dynamic_environments.sh

  • After 7 days, retire the environment
  • (Git) remove, commit and push the removal

This script can be run regularly in a cron.

In the ‘real’ aws environment I get the EC2 instance to self-destruct after a few hours, but for belt and braces we destroy the environment and remove it from git.

#!/bin/bash

# We need extended glob capabilities.
shopt -s extglob

# Ensure we are in the right folder
pushd $(dirname ${BASH_SOURCE[0]})

# Default to destroying environments over 7 days old.
# If you want to destroy all of them, pass in '-1' as an argument.
DAYS=${1:-7}

# Get today's 'day of year'
TODAY=$(date +%j)

# Remove leading zeroes from the date.
TODAY=${TODAY##+(0)}

# Go through all the environment folders, and terraform destroy,
# git remove and remove the folder.
for dir in $(find dynamic_environment_* -type d -maxdepth 0)
do
        # Remove the folder prefix.
        dir_day=${dir##*_}

        # Remove any leading zeroes from the day of year.
        dir_day=${dir_day##+(0)}

        # If over 7 days old...
        if [[ $(( ${TODAY} - ${dir_day})) -gt ${DAYS} ]]
        then
                pushd "${dir}"

                # Destroy the environment.
                terraform destroy -force
                popd

                # Remove from git.
                git rm -rf "${dir}"
                git commit -am "destroyed ${dir}"
                git push

                # Remove left-over backup files.
                rm -rf "${dir}"
        fi
done

My book Docker in Practice 

DIP

Get 39% off with the code: 39miell

Bash to Python Converter

tl;dr

Ever start a bash script, then wish you’d started it in python?

Use this Docker image to convert your script.

Introduction

I routinely use both bash and python to quickly whip up tools for short and long-term uses.

Generally I start with a bash script because it’s so fast to get going, but as time goes on I add features, and then wish I had started it in python so that I could access all the modules and functionality that’s harder to get to in bash.

I found a bash2py tool, which looked good, but came as a zipped source download (not even in a git repo!).

I created a Docker image to convert it, and have used it a couple of times. With a little bit of effort you can quickly convert your bash script to a python one and move ahead.

Example

I’m going to use an artificially simple but realistic bash script to walk through a conversion process.

Let’s say I’ve written this bash script to count the number of lines in a list of files, but want to expand this to do very tricky things based on the output:

#!/bin/bash
if [ $# -lt 1 ]
then
  echo "Usage: $0 file ..."
  exit 1
fi

echo "$0 counts the lines of code" 

l=0

for f in $*
do
 l=`wc -l $f | sed 's/^\([0-9]*\).*$/\1/'`
 echo "$f: $l"
done

Here’s a conversion session:

imiell@Ians-Air:/space/git/work/bin$ docker run -ti imiell/bash2py
Unable to find image 'imiell/bash2py:latest' locally
latest: Pulling from imiell/bash2py
357ea8c3d80b: Already exists 
98b473a7fa6a: Pull complete 
a7f8553161b4: Pull complete 
a1dc4858a149: Pull complete 
752a5d408084: Pull complete 
cf7fa7bc103f: Pull complete 
Digest: sha256:110450838816d2838267c394bcc99ae00c99f8162fa85a1daa012cff11c9c6c2
Status: Downloaded newer image for imiell/bash2py:latest
root@89e57c8c3098:/opt/bash2py-3.5# vi a.sh
root@89e57c8c3098:/opt/bash2py-3.5# ./bash2py a.sh 
root@89e57c8c3098:/opt/bash2py-3.5# python a.sh.py 
Usage: a.sh.py file ...
root@89e57c8c3098:/opt/bash2py-3.5# python a.sh.py afile
a.sh.py counts the lines of code
afile: 16

So that’s nice, I now have a working python script I can continue to build on!

Simplify

Before you get too excited, unfortunately it’s not magically working out which python modules to import and cleverly converting everything from bash to python. However, what’s convenient about this is that you can adjust the script where you care about it, and build from there.

To work through this example, here is the raw conversion:

#! /usr/bin/env python
from __future__ import print_function

import sys,os

class Bash2Py(object):
  __slots__ = ["val"]
  def __init__(self, value=''):
    self.val = value
  def setValue(self, value=None):
    self.val = value
    return value

def GetVariable(name, local=locals()):
  if name in local:
    return local[name]
  if name in globals():
    return globals()[name]
  return None

def Make(name, local=locals()):
  ret = GetVariable(name, local)
  if ret is None:
    ret = Bash2Py(0)
    globals()[name] = ret
  return ret

def Array(value):
  if isinstance(value, list):
    return value
  if isinstance(value, basestring):
    return value.strip().split(' ')
  return [ value ]

class Expand(object):
  @staticmethod
  def at():
    if (len(sys.argv) < 2):
      return []
    return  sys.argv[1:]
  @staticmethod
  def star(in_quotes):
    if (in_quotes):
      if (len(sys.argv) < 2):
        return ""
      return " ".join(sys.argv[1:])
    return Expand.at()
  @staticmethod

  def hash():
    return  len(sys.argv)-1

if (Expand.hash() < 1 ):
    print("Usage: "+__file__+" file ...")
    exit(1)

print(__file__+" counts the lines of code")

l=Bash2Py(0)

for Make("f").val in Expand.star(0):
    Make("l").setValue(os.popen("wc -l "+str(f.val)+" | sed \"s/^\\([0-9]*\\).*$/\\1/\"").read().rstrip("\n"))
    print(str(f.val)+": "+str(l.val))

The guts of the code is in the for loop at the bottom.

bash2py does some safe conversion and wrapping of the bash script into some methods such as ‘Make’, ‘Array’ et al that we can get rid of with a little work.

By replacing:

  • Bash2Py(0) with 0
  • Make(“f”).val with f
    • and Make(“l”) with l etc
  • f.val with f
    • and l.val with l etc
54,57c27,30
< l=Bash2Py(0)
< for Make("f").val in Expand.star(0):
< Make("l").setValue(os.popen("wc -l "+str(f.val)+" | sed \"s/^\\([0-9]*\\).*$/\\1/\"").read().rstrip("\n"))
< print(str(f.val)+": "+str(l.val))
---
> l=0
> for f in Expand.star(0):
> l = os.popen("wc -l "+str(f)+" | sed \"s/^\\([0-9]*\\).*$/\\1/\"").read().rstrip("\n")
> print(str(f)+": "+str(l))

I simplify that section.

I can remove the now-unused methods to end up with the simpler:

#! /usr/bin/env python

from __future__ import print_function

import sys,os

class Expand(object):
  @staticmethod
  def at():
    if (len(sys.argv) < 2):
      return []
    return  sys.argv[1:]
  @staticmethod
  def star(in_quotes):
    if (in_quotes):
      if (len(sys.argv) < 2):
        return ""
      return " ".join(sys.argv[1:])
    return Expand.at()
  @staticmethod
  def hash():
    return  len(sys.argv)-1

if (Expand.hash() < 1 ):
    print("Usage: "+__file__+" file ...")
    exit(1)

print(__file__+" counts the lines of code")

l=0

for f in Expand.star(0):
    l = os.popen("wc -l "+str(f)+" | sed \"s/^\\([0-9]*\\).*$/\\1/\"").read().rstrip("\n")
    print(str(f)+": "+str(l))

Note I don’t bother with ‘Expand’ yet, but I can pythonify that later if I choose to.

Docker image

Available here.


If you like this, you might like one of my books:
Learn Bash the Hard Way

Learn Git the Hard Way
Learn Terraform the Hard Way

LearnGitBashandTerraformtheHardWay
Buy in a bundle here

Hello world Unikernel Walkthrough


Introduction

Unikernels are a relatively new concept to most people in IT, but have been around for a while.

They are operating system running as VMs under a hypervisor, but are:

  • Single-purpose
  • Only use the libraries they need
    • A unikernel might not have networking (for example)
  • Built from a set of available libraries which are dynamically pulled into the image as needed

So rather than starting from a ‘complete’ OS like Linux and then stripping out what’s not needed, only what’s needed to run the OS is included.

This brings some benefits:

  • Smaller OS image size
  • Smaller security attack surface
  • Fast bootup
  • Small footprint
  • True isolation from other OSes on the same host

Docker recently bought a unikernel company and promptly used their technology to deliver a very impressive Beta for Mac using xhyve. The end result was a much improved user experience delivered surprisingly quickly.


Walkthrough

This walkthrough uses one flavour of unikernel (MirageOS) to demonstrate the building of a unikernel as a Unix binary and as a xen VM image.

The unikernel uses the console library to print out ‘hello world’ four times and exit.

It sets up an Ubuntu xenial VM and compiles the binary and VM image. The VM image is run using the xl tool, which runs up the VM as though it were a VM running under Xen.

The code is here.


Video

Here is a video of the code running on my home server:


My book Docker in Practice 

DIP

Get 39% off with the code: 39miell

A checklist for Docker in the Enterprise

Overview

[A video of me talking about this is available here]

Docker is extremely popular with developers, having gone as a product from zero to pretty much everywhere in a few years.

I started tinkering with Docker three years ago, got it going in a relatively small corp (700 employees) in a relatively unregulated environment. This was great fun: we set up our own registry, installed Docker on our development servers, installed Jenkins plugins to use Docker containers in our CI pipeline, even wrote our own build tool to get over the limitations of Dockerfiles.

I now work for an organisation working in arguably the most heavily regulated industry, with over 100K employees. The IT security department itself is bigger than the entire company I used to work for.

There’s no shortage of companies offering solutions that claim to meet all the demands of an enterprise Docker platform, and I seem to spend most of my days being asked for opinions on them.

I want to outline the areas that may be important to an enterprise when considering developing a Docker infrastructure.

If I’ve missed anything or you have any comments get in touch below or tweet @ianmiell

Images

Registry

You will need a registry. There’s an open source one (Distribution), but there’s numerous offerings out there to choose from if you want to pay for an enterprise one.

  • Does this registry play nice with your authentication system?
  • Does it have a means of promoting images?
  • Does it have role-based access control?
  • Does it cohere well with your other artifact stores?

Image Scanning

An important one.

When images are uploaded to your registry, you have a golden opportunity to check that they conform to standards. For example, could these questions be answered:

  • Is there a shellshock version of bash on there?
  • Is there an out of date ssl library?
  • Is it based on a fundamentally insecure or unacceptable base image?

Static image analysers exist and you probably want to use one.

Image Building

How are images going to be built? Which build methods will be supported and/or are strategic for your organisation? How do these fit together?

Dockerfiles are the standard, but some users might want to use S2I, Docker + Chef/Puppet/Ansible or even hand-craft them.

  • Which CM tool do you want to mandate (if any)
  • Can you re-use your standard governance process for your configuration management of choice?
  • Can anyone build an image?

Image Integrity

You need to know that the images running on your system haven’t been tampered with between building and running.

  • Have you got a means of signing images with a secure key?
  • Have you got a key store you can re-use?
  • Can that key store integrate with the products you choose?

Third Party Images

Vendors will arrive with Docker images expecting there to be a process of adoption.

  • Do you have a governance process already for ingesting vendor technology?
  • Can it be re-used for Docker images?
  • Do you need to mandate specific environments (eg DMZs) for these to run on?
  • Will Docker be available in those environments?

SDLC

If you already have software development lifecycle (SDLC) processes, how does Docker fit in?

  • How will patches be handled?
  • How do you identify which images need updating?
  • How do you update them?
  • How do you tell teams to update?
  • How do you force them to update if they don’t do so in a timely way?

Secrets

Somehow information like database passwords need to be passed into your containers. This can be done at build time (probably a bad idea), or at run time.

  • How will secrets be managed within your containers?
  • Is the use of this information audited/tracked and secure?

Base Image?

If you run Docker in an enterprise, you might want to mandate the use of a company-wide base image:

  • What should go into this base image?
  • What standard tooling should be everywhere?
  • Who is responsible for it?


Security and Audit

The ‘root’ problem

By default, access to the docker command implies privileges over the whole machine. This is unlikely to be acceptable to most sec teams in production.

  • Who (or what) is able to run the docker command?
  • What control do you have over who runs it?
  • What control do you have over what is run?

Solutions exist for this, but they are relatively new.

Monitoring what’s running

A regulated enterprise is likely to want to be able to determine what is running across its estate. What can not be accounted for?

  • How do you tell what’s running?
  • Can you match that content up to your registry/registries?
  • Is what is running up to date?
  • Have any containers changed critical files since startup?

Forensics

When things go wrong people will want to know what happened. In the ‘old’ world of physicals and VMs there were a lot of safeguards in place to assist post-incident investigation. A Docker world can become one without ‘black box recorders’.

  • Can you tell who ran a container?
  • Can you tell who built a container?
  • Can you determine what a container did once it’s gone?
  • Can you determine what a container might have done once it’s gone?


Operations

Logging

Application logging is likely to be a managed or controlled area of concern:

  • Do the containers log what’s needed for operations?
  • Do they follow standards for logging?
  • Where do they log to?
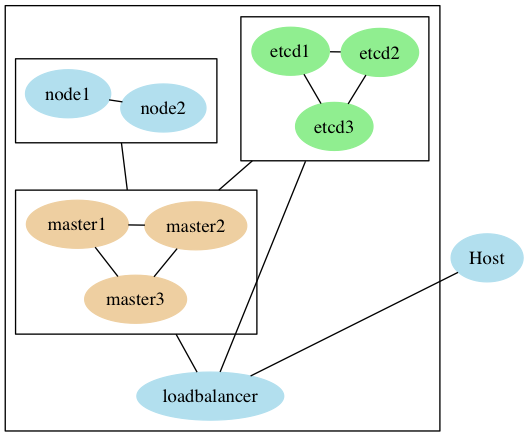
 

Orchestration

Containers can quickly proliferate across your estate, and this is where orchestration comes in. Do you want to mandate one?

  • Does your orchestrator of choice play nicely with other pieces of your Docker infrastructure?
  • Do you want to bet on one orchestrator, hedge with a mainstream one, or just sit it out until you have to make a decision?

Operating System

Enterprise operating systems can lag behind the latest and greatest.

  • Is your standard OS capable of supporting all the latest features? For example, some orchestrators and Docker itself require kernel versions or packages that may be more recent than is supported. This can come as a nasty surprise…
  • Which version of Docker is available in your local package manager?


Development

Dev environments

  • Developers love having admin. Are you ready to effectively give them admin with Docker?
  • Are their clients going to be consistent with deployment? If they’re using docker-compose, they might resent switching to pods in production.

CI/CD

Jenkins is the most popular CI tool, but there’s other alternatives popular in the enterprise.

  • What’s your policy around CI/CD plugins?
  • Are you ready to switch on a load of new plugins PDQ?
  • Does your process for CI cater for ephemeral Jenkins instances as well as persistent, supported ones?


Infrastructure

Shared Storage

Docker has in its core the use of volumes that are independent of the running containers, in which persistent data is stored.

  • Is shared storage easy to provision?
  • Is shared storage support ready for increased demand?
  • Is there a need for shared storage to be available across deployment locations?

Networking

Enterprises often have their own preferred Software Defined Networking solutions, such as Nuage, or new players like Calico.

  • Do you have a prescribed SDN solution?
  • How does that interact with your chosen solutions?
  • Does SDN interaction create an overhead that will cause issues?

aPaaS

Having an aPaaS such as OpenShift or Tutum Cloud can resolve many of the above questions by centralising and making supportable the context in which Docker is run.

  • Have you considered using an aPaaS?
  • Which one answers the questions that need answering?


Cloud Providers

If you’re using a cloud provider such as Amazon or Google:

  •  How do you plan to deliver images and run containers on your cloud provider?
  • Do you want to tie yourself into their Docker solutions, or make your usage cloud-agnostic?


Hey, what about x?

Get in touch: @ianmiell
My book Docker in Practice 

DIP

Get 39% off with the code: 39miell2

A Quick Tour of Docker 1.12

This is a video going over some of Docker’s new features.


It:

  • Builds an image with the new HEALTHCHECK dockerfile command
  • Creates a docker swarm
  • Creates a service
  • Scales the service to two instances
  • Removes the service


The code for it is here.
My book Docker in Practice 

DIP

Get 39% off with the code: 39miell

Power ‘git log’ graphing

‘git log’ Graphing

Recently I’ve become responsible for a large project with lots of branches and a complex history I frequently need to dig into. I prefer to work on the command line, so ended up exploring various git log options.

I haven’t found a good write-up of these, so here is my attempt at sharing one with you.

tl;dr

I use this alias everywhere:

alias gitgraph="git log --graph --oneline --all --decorate --topo-order"

Screen Shot 2016-06-04 at 14.24.06.png

git log

In case you’re not familiar with it already, the command to show the history from your current point is:

git log

The output is most-recent commit first, down to the oldest.

Screen Shot 2016-06-04 at 13.53.53.png


–oneline

Most of the time I don’t care about the author or the date, so in order that I can see more per screen, I use –oneline to only show the commit id and comment per-commit.

git log --oneline 

Screen Shot 2016-06-04 at 12.15.56

–graph

The problem with the above is that you only see a linear series of commits, and get no sense of what was merged in where. To see this aspect of the history use –graph.

git log --oneline --graph

Screen Shot 2016-06-04 at 13.39.50.png

You can see where merges take place, and what commits were merged.

–all

By default you only get the history leading up to the HEAD (ie where you are currently in the git history. Often I want to see all the branches in the history, so I add the –all flag.

git log --graph --oneline --all

Screen Shot 2016-06-04 at 13.40.16.png

–decorate

That’s great, but I can’t see what branch is where! This is where you use –decorate.

git log --graph --oneline --all --decorate

Screen Shot 2016-06-04 at 13.40.40.png

Now we’re cooking with gas! Each remote or type of branch/tag is shown in a different colour (even stashes!). On my terminal, remotes are in red, HEAD is blue, local branches are in green, stashes in pink.

If you want, you can show the ref name on each line by adding –source, but I usually find this to be overkill:

git log --graph --oneline --all --decorate --source

Screen Shot 2016-06-04 at 13.53.25.png

–simplify-by-decoration

If you’re looking at the whole history of your project, you may want to see only the significant points of change (ie the lines affected by –decorate above) to eliminate all the intermediary commits. This is perfect for getting an overview of the project as a whole.

git log --graph --oneline --all --decorate --simplify-by-decoration

Screen Shot 2016-06-04 at 13.42.01.png

–pretty

When viewing the whole history of the project in this way, you might want to re-introduce the Date info with –pretty=

git log --graph --oneline --all --decorate --simplify-by-decoration --pretty='%ar %s %h' 

This gives a formatted output, showing (in this case) the relative timestamp (%ar), the commit subject (%s), and the short hash (%h).

Screen Shot 2016-06-04 at 13.49.55.png

You can even see the abstract shape of the git repo!

git log --graph --oneline --all --decorate --simplify-by-decoration --pretty= 

Screen Shot 2016-06-04 at 13.43.18.png

–topo-order

The order in which commits are displayed. Although it appears to be the default, it’s worth knowing that –topo-order shows commits ‘bunched together’ by topic, rather than in date order. This leads to easier-to-read graphs in complex projects.

git log --graph --oneline --all --decorate --topo-order

Other options include –date-order and –reverse.

Strangely, you can’t use –graph with –reverse, but you can do this:

git log --graph --oneline --all --decorate --simplify-by-decoration | tac

Screen Shot 2016-06-04 at 13.52.36.png

To show commits from oldest to newest.

(tac is available in the coreutils package – see here for mac)


This is based on work in progress from the second edition of Docker in Practice 

Get 39% off with the code: 39miell2


ssh -R (reverse tunnel) man page hell


About once every few months I have to set up a reverse tunnel.

I’ve learned the hard way to not read the man page, and just wing it.

After setting one up the other day I looked at the man page to see if it made sense whilst having a picture of its operating still in my mind.

*-R* [bind_address:]port:host:hostport

             Specifies that the given port on the remote (server) host is to be forwarded to the given host and port on the local side.
This works by allocating a socket to listen to port on the remote side, and whenever a connection is made to this port, the connec-tion is forwarded over the secure channel, and a connection is made to host port hostport from the local machine.

We all got that, right?

Break it down

OK, maybe I just wasn’t paying close enough attention, so I’m going to read it carefully and take notes while doing so:

  • The given port [which given port? port? or hostport?] on the remote (server) [hang on, which is the remote/server here? is it the ‘host’?] host [ok, so the remote/server is ‘host’ here? maybe? that would mean that host == server == remote?] is to be forwarded to the given host and port on the local side [which port? same as previously mentioned port? does that mean the previously-mentioned port is the hostport? what’s the ‘local side’ here? local to where I ssh to? or local to where I run ssh?]

At this point I’m basically crying.

  • This works [so we presumably understand what’s going on by this point!] by allocating a socket to listen to port on the remote side [which is the remote side?], and whenever a connection is made to this port [ah, does this mean it’s the port on the machine I connect to (ie the ‘port’)?], the connection is forward over the secure channel, and a connection is made to host port hostport [wtf? ok, just ignore ‘host port’ there. I think we might be able to conclude that hostport is the port we are forwarding to, and the host is the host of the hostport] from the local machine [ok, now I think that the local machine is the machine we log onto. I hope that’s right].


Understand it Visually

ssh (1)


  • A – Your ssh -R command connects to the ‘fromhost’. The ‘fromhost’ is the host from which you want to connect to the server.
  • B – Your ssh -R command connects to the server on the serverport
  • C – The port that was allocated on the ‘fromhost’ accepts tcp requests, and passes the data to the server:serverport via the intermediary host on which ssh -R was run.


I hope this helps someone.

Please tweet any corrections or comments to: @ianmiell

My book Docker in Practice 

DIP

Get 39% off with the code: 39miell