Docker Migration In-Flight CRIU

Docker CRIU Demo

tl;dr

An automated, annotated, interactive demo of live container migration using Virtualbox, Vagrant and ShutIt.

Currently co-authoring a book on Docker: Get 39% off with the code 39miell

dip

CRIU?

CRIU is a technology designed to allow the checkpointing and restoration of programs in userspace in the Linux kernel.

Containerization is a natural fit for this, since in theory most of its dependencies are contained and thus easier to reason about.

Work is proceeding on this technology, and this demo gives a flavour of what’s possible. It’s based on a post Circle-CI recently published.

It shows:

  • A container being checkpointed and restarted
  • A container with state being checkpointed and restarted
  • A container with state being moved from one VM to another

You can see it in action here, and the code is here.

I think this technology is a giant leap forward for Docker. The applications for this for testing, delivery and operations are immense.

Another recent demo involving live Quake migration is here.


Refs:

http://criu.org/Docker

http://blog.kubernetes.io/2015/07/how-did-quake-demo-from-dockercon-work.html


A High Availability Phoenix and A/B Deployment Framework using Docker

Currently co-authoring a book on Docker: Get 39% off with the code 39miell

dip

tl;dr

A four-step worked example of a process for creating a phoenix-deployed service fronted by haproxy, with two swappable backends deployed using Docker containers, enabling continuous delivery with minimal effort.

Introduction

I’ve long been interested in Phoenix deployment, and Docker as a means of achieving it. I’ve built my own Phoenix deployment framework which I use to automate deployment and auto-rebuild and deploy from scratch daily.

Phoenix Deployment?

Phoenix deployment is the principle of rebuilding ‘from scratch’ rather than updating an environment. Tools like Chef and Puppet are great for managing long-lived servers, but nothing beats regular rebuilds and deployments for ensuring you can reason about your environments.

I’ve been using Phoenix deployment to rebuild applications and services on a daily basis regardless of whether changes have been made. See here and here for previous posts on the subject.

Architecture

If you’re refreshing a service though you generally need to minimise downtime while. To achieve this, I use HAProxy to provide a stable endpoint for two backends – ‘old’ and ‘new’, as this figure shows:

Phoenix_Shutit

Image A and Image B are constructed from scratch each time using ShutIt, an automation tool designed with Phoenix deployments in mind.


Worked Example

Here’s a worked example. In it you will create an image that acts as a simple echo server, and then change the code and redeploy the service as a server that converts strings to hex.

Note: tested on a Digital Ocean 14.0.4 image.


1) Install pre-requisites:

sudo apt-get update && apt-get install python-pip git docker
sudo pip install shutit

2) Create phoenix build

Create the skeleton script, accepting the defaults:

user@host$ shutit skeleton

# Input a new directory name for this module.
# Default: /tmp/shutit_cohort

# Input module name.
# Default: shutit_cohort

# Input a unique domain.
# Default: imiell.shutit_cohort

# Input a delivery method from: ('docker', 'dockerfile', 'ssh', 'bash').
# Default: docker

docker = build within a docker image
dockerfile = call "shutit build" from within a dockerfile
ssh = ssh to target and build
bash = run commands directly within bash

================================================================================
Run:
cd /tmp/shutit_cohort/bin && ./build.sh
to build.
An image called shutit_cohort will be created
and can be run with the run.sh command in bin/.
================================================================================


3) Edit build

In this step you’re going to set up your echo server application as a simply python script embedded in a container image.

Go to the directory just created, eg for the above output:

cd /tmp/shutit_cohort

and open the python file in there:

vi shutit_cohort.py

and change the build method so it looks like this:

def build(self,shutit):
[...]
    # shutit.set_password(password, user='')
    # - Set password for a given user on target       
    shutit.install('socat')
    shutit.send(r'''echo socat tcp-l:80,fork exec:/bin/cat > /echo.sh''')
    shutit.send('chmod +x /echo.sh')

The line:

shutit.install('socat')

ensures that socat is installed on the container, and the next lines:

    shutit.send(r'''echo socat tcp-l:80,fork exec:/bin/cat > /echo.sh''')
    shutit.send('chmod +x /echo.sh')

creates the file ‘/echo.sh’ on the container as an executable using socat that acts as an echo server.

You want your service to run the python script, so change the file ‘bin/run.sh’ and change the last line from this:

${DOCKER} run -d --name ${CONTAINER_NAME} ${DOCKER_ARGS} ${IMAGE_NAME} /bin/sh -c 'sleep infinity'

to this:

${DOCKER} run -d --name ${CONTAINER_NAME} ${DOCKER_ARGS} ${IMAGE_NAME} /bin/sh -c '/echo.sh'

ie replace ‘sleep forever’ with your ‘/echo.sh’ command.

Note: Will use ports 8080-8082.

If these are used for other services, change the ports in phoenix.sh

4) Build and deploy the service

OK, we’re ready to go.

cd bin
sudo ./phoenix.sh

Kicks off the build and deploys the service. It builds and run the HAProxy server and the image that acts as back end ‘A’.

# CONTAINER_ID: 37352b9918bd08b843f2c5174266e1af199b6d05520551b4f9f0489342995618
# BUILD REPORT FOR BUILD END phoenix_imiell_1440614873.89.890216
###############################################################################

Build log file: /tmp/shutit_root/phoenix_imiell_1440614873.89.890216/shutit_build.log
/tmp/shutit_coolly/bin
f500e552cdd20445266ed4d6fa2d1ba3d55ca9845ea39744fc1c8ba1dd96a762

docker ps -a shows our two servers: haproxy taking requests on the host network, and passing it to the backend on 8081:

$ docker ps -a | grep shutit
f500e552cdd2  shutit_coolly          "/bin/sh -c /echo.sh"     0.0.0.0:8081->80/tcp   shutit_coolly
b28abcb76612  shutit_coolly_haproxy  "haproxy -f /usr/loca"                           shutit_coolly_haproxy

Now test your echo server:

imiell@phoenix:/tmp/shutit_coolly/bin$ telnet localhost 8080
Trying 127.0.0.1...
Connected to localhost.
Escape character is '^]'.
hello phoenix
hello phoenix

Note: You only need sudo if you need sudo to run docker on your host.

5)Iterate and re-deploy

Now you’re going to change the server and redeploy. We want to use cat’s -A flag to output more details when echoing, so change the socat line in the python script to:

shutit.send(r'''echo socat tcp-l:80,fork exec:'/bin/cat -A' > /echo.sh''')

and re-run the phoenix.sh as  you did before. When done, docker ps -a now shows the container running on port 8082 (ie the ‘B’ port):

$ docker ps -a | grep shutit
af0abdd3abc9 shutit_coolly         "/bin/sh -c /echo.sh"  0.0.0.0:8082->80/tcp shutit_coolly
b28abcb76612 shutit_coolly_haproxy "haproxy -f /usr/loca"                      shutit_coolly_haproxy

and to verify it’s worked:

$ telnet localhost 8080
Trying 127.0.0.1...
Connected to localhost.
Escape character is '^]'.
hello phoenix
hello phoenix^M$

Conclusion

By putting this code into git you can easily create a continuous deployment environment for your service that doesn’t interfere with other services, and is easy to maintain and keep track of.

I use this framework for various microservices I use on my home server, from databases I often want to run queries on to websites I manage. And this blog :)

Quick Intro to Kubernetes

Currently co-authoring a book on Docker: Get 39% off with the code 39miell

dip

Overview

Before we get going with Kubernetes, it’s a good idea to get a picture of Kubernetes’ high-level architecture.

kubernetes-key-concepts

Kubernetes has a master-minion architecture. Master nodes are responsible for receiving orders about what should be run on the cluster and orchestrating its resources. Each minion has Docker installed on it, and a ‘kubelet’ service, which manages the pods (sets of containers) running on each node. Information about the cluster is maintained in etcd, a distributed key-value data store, and this is the cluster’s source of truth.

What’s a Pod?

We’ll go over it again later in this article, so don’t worry about it so much now, but if you’re curious, a pod is a grouping of related containers. The concept exists to facilitate simpler management and maintenance of Docker containers.

The end goal of Kubernetes is to make running your containers at scale a simple matter of declaring what you want and letting Kubernetes take care of ensuring the cluster achieves your desires. In this technique you will see how to scale a simple service to a given size by running one command.

Why was Kubenetes built?

Kubernetes was originally developed by Google as a means of managing containers at scale. Google has been running containers for over a decade at scale, and decided to develop this container orchestration system when Docker became popular. It builds on the lessons learned from this extensive experience. It is also known as ‘K8s’.

Installation

To install Kubernetes you have a choice. You can either install directly on your host, which will give you a single-minion cluster, or use Vagrant to install a multi-minion cluster managed with VMs.

To install a single-minion cluster on your host, run:

export KUBERNETES_PROVIDER=vagrant
curl -sS https://get.k8s.io | bash

Latest instructions here

If you want to install a multi-minion cluster, you have another choice. Either follow the instructions on the Kubernetes GitHub repository (see ‘Latest instructions’ above) for Vagrant, or you can try an automated script maintained by me which sets up a two-minion cluster: see here

If you have Kubernetes installed you can follow along from here. The following output will be based on a multi-node cluster. Next we’re going to start simply by creating a single container and using Kubernetes to scale it up.

Scaling a Single Container

You can start up a pod from an image stored on the Docker Hub with the ‘run-container’ subcommand to kubectl.

The following command starts up a pod, giving it the name ‘todo’, and telling Kubernetes to use the dockerinpractice/todo image from the DockerHub.

$ kubectl run-container todo --image=dockerinpractice/todo

Now if you run the ‘get pods’ subcommand you can list the pods, and see that it’s in a ‘Pending’ state, most likely because it’s downloading the image from the Docker Hub

$ kubectl get pods | egrep "(POD|todo)"
POD        IP          CONTAINER(S)       IMAGE(S) HOST LABELS STATUS  CREATED         MESSAGE
todo-hmj8e 10.245.1.3/ run-container=todo                      Pending About a minute

After waiting a few minutes for the todo image to download, you will eventually see that its status has changed to ‘Running’:

$ kubectl get pods | egrep "(POD|todo)"
POD        IP         CONTAINER(S) IMAGE(S) HOST                  LABELS             STATUS  CREATED   MESSAGE
todo-hmj8e 10.246.1.3                       10.245.1.3/10.245.1.3 run-container=todo Running 4 minutes
                      todo dockerinpractice/todo                                     Running About a minute

This time the ‘IP’, ‘CONTAINER(S)’ and ‘IMAGE(S)’ columns are populated. The IP column gives the address of the pod (in this case ‘10.246.1.3’), the container column has one row per container in the pod (in this case we have only one, ‘todo’). You can test that the container (todo) is indeed up and running and serving requests by hitting the IP address and port directly:

$ wget -qO- 10.246.1.3:8000
[...]

Scale

At this point we’ve not seen much difference from running a Docker container directly. To get your first taste of Kubernetes you can scale up this service by running a resize command:

$ kubectl resize --replicas=3 replicationController todo
resized

This command has specified to Kubernetes that we want the todo replication controller to ensure that there are three instances of the todo app running across the cluster.

What is a replication controller?
A replication controller is a Kubernetes service that ensures that the
right number of pods are running across the cluster.


$ kubectl get pods | egrep "(POD|todo)"
POD IP CONTAINER(S) IMAGE(S) HOST LABELS STATUS CREATED MESSAGE
todo-2ip3n 10.246.2.2 10.245.1.4/10.245.1.4 run-container=todo Running 10 minutes
todo dockerinpractice/todo Running 8 minutes
todo-4os5b 10.246.1.3 10.245.1.3/10.245.1.3 run-container=todo Running 2 minutes
todo dockerinpractice/todo Running 48 seconds
todo-cuggp 10.246.2.3 10.245.1.4/10.245.1.4 run-container=todo Running 2 minutes
todo dockerinpractice/todo Running 2 minutes

Kubernetes has taken the resize instruction and the todo replication controller and ensured that the right number of pods are started up. Notice that it placed two on one host (10.245.1.4) and one on another (10.245.1.3). This is because Kubernetes’ default scheduler has an algorithm that spreads pods across nodes by default.

You’ve started to see how Kubernetes can make management of containers easier across multiple hosts. Next we dive into the core Kubernetes concept of pods.

Pods

A pod is a collection of containers that are designed to work together in some way that share resources.

Each pod gets its own IP address, and shares the same volumes and network port range. Because a pod’s containers share a ‘localhost’, the containers can rely on the different services being available and visible wherever they are deployed.

The following figure illustrates this with two containers that share a volume.

pods

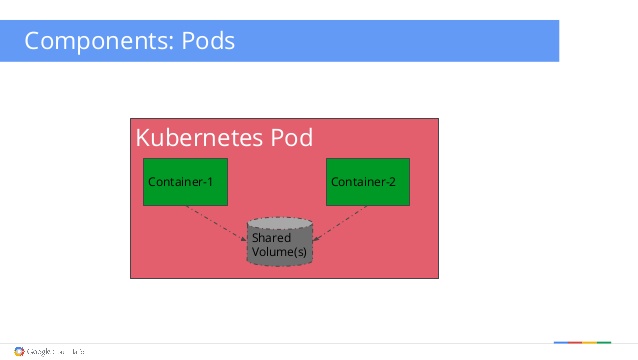
In the above figure Container1 might be a webserver that reads data files from the shared volume which is in turn updated by Container2. Both containers are therefore stateless, while state is stored in the shared volume.

This facilitates a microservices approach by allowing you to manage each part of your service separately, allowing you to upgrade one image without needing to be concerned with the others.

The following Pod specification defines a complex pod that has a container that writes random data (simplewriter) to a file every five seconds, and another container that reads from the same file (simplereader). The file is shared via a volume (pod-disk).

{
  "id": "complexpod",
  "kind": "Pod",
  "apiVersion": "v1beta1",
  "desiredState": {
  "manifest": {
    "version": "v1beta1",
    "id": "complexpod",
    "containers": [{
      "name": "simplereader",
      "image": "dockerinpractice/simplereader",
      "volumeMounts": [{
        "mountPath": "/data",
        "name": "pod-disk"
      }]},{
        "name": "simplewriter",
        "image": "dockerinpractice/simplewriter",
        "volumeMounts": [{
          "mountPath": "/data",
          "name": "pod-disk"
        }]
      }],
      "volumes": [{
        "name": "pod-disk",
        "emptydir": {}
      }]
    }
  }
}

Have a look at the pod specification above. The mount path is the path to the volume mounted on the filesystem of the container. This could be set to a different location for each container. The volume mount name refers to the matching name in the pod manifest’s
‘volumes’ definition. The ‘volumes’ attribute defines the volumes created for this pod. The name of the volume is what’s referred to in the volumeMounts entries above. ’emptydir’ is a temporary directory that shares a pod’s lifetime. Persistent volumes are also available.

To load this pod specification in create a file with the above listing in run:

$ kubectl create -f complexpod.json
pods/complexpod

After waiting a minute for the images to download, you can see the log output of the container by running the ‘kubectl log’ and specifying first the pod and then the container you are interested in.

$ kubectl log complexpod simplereader
 2015-08-04T21:03:36.535014550Z '? U
 [2015-08-04T21:03:41.537370907Z] h(^3eSk4y
 [2015-08-04T21:03:41.537370907Z] CM(@
 [2015-08-04T21:03:46.542871125Z] qm>5
 [2015-08-04T21:03:46.542871125Z] {Vv_
 [2015-08-04T21:03:51.552111956Z] KH+74 f
 [2015-08-04T21:03:56.556372427Z] j?p+!

What Next

We’ve just scratched the surface of Kubernetes’ capabilities and potential here, but this should give a flavour of what can be done with it, and how it can make orchestrating Docker containers simpler.

Take OpenShift for a spin in four commands

Currently co-authoring a book on Docker: Get 39% off with the code 39miell

dip

OpenShift

Is RedHat’s application Platform as a Service (aPaaS). It builds on Docker and Kubernetes to provide an Enterprise-level service for application provisioning.

PaaSes bring a great of benefits with them: centralised resource management, quotas, isolation,

OpenShift is a relatively old product in aPaaS terms. What’s changed recently is that version 3 has been substantially changed to be built around Docker and Kubernetes and written in Go, which are seen as stable building blocks for the future.

In this article you’re going to get OpenShift set up in 5 commands, and see an application provisioned, built and deployed using just a login and a GitHub reference.

NOTE: It will be safer/easier to run if you already have Vagrant+Virtualbox installed. The script will try to install it for you if it’s not already though. This has primarily been tested on Ubuntu and Mac (on tin). If you have other operating systems, please get in touch if you come across problems.

Get Going

Run these four commands (assumes you have pip and git already):

sudo pip install shutit
git clone --recursive https://github.com/ianmiell/shutit-openshift-origin
cd shutit-openshift-origin
./run.sh

And you will get a desktop with OpenShift installed.

NOTE: You’ll need a decent amount of memory free (2G+), and may need to input your password for sudo. You’ll be prompted for both. You can choose to continue with less memory, but you may go into swap or just run out.

NOTE: Assumes you have pip. If not, try this:

sudo apt-get install python-pip || yum install python-pip || yum install python || sudo easy_install python || brew install python

Open up a browser within this desktop and navigate to:

https://localhost:8443

and bypass all the security warnings until you end up at the login screen.

Openshift_login

Now log in as hal-1 with any password.

Build a nodejs app

OK, you’re now logged into OpenShift as a developer.

Openshift_project


Create a project by clicking ‘Create’ (a project has been set up but this has quotas set up to demo limits). Fill out the form.

OpenShift_create_proj

and click ‘Create’ again.

Once the Project is set up, click on ‘Create’ again, in the top right hand side this time.

OpenShift_project_github

Choose a builder image (pick nodes:0.10). This build image defines the context in which the code will get built. See my source to image post for more on this.

OpenShift-builder_image

Now click on ‘Create’ on the nodejs page.

If you wait, then after a few minutes you should see a screen like the following:

OpenShift_start_build

and eventually, if you scroll down you will see that the build has started:

OpenShift_building

Eventually, you will see that the app is running:

OpenShift_running

and by clicking on ‘Browse’ and ‘Pods’ you can see that the pod has been deployed:

OpenShift_pods

Now, how to access it? If you look at the services tab:

OpenShift_service

you will see an ip address and port number to access. Go there, and voila, you have your nodejs app:

OpenShift_nodejs_app

Further Work

Now fork the github repo, make a change, and do a build against this fork.

If you can’t be bothered, use my fork at: https://github.com/docker-in-practice/nodejs-ex


Conclusion

There’s a lot more to OpenShift than this. If you want to read more see here:

https://docs.openshift.org/latest/welcome/index.html

Any problems with this, raise an issue here:

https://github.com/ianmiell/shutit-openshift-origin

or leave a message


RedHat’s Docker Build Method – S2I

Currently co-authoring a book on Docker: Get 39% off with the code 39miell

dip

Overview

‘Source To Image’ is a means of creating Docker images by depositing source code into a separately-defined Docker image that is responsible for building the image.

You may be wondering why such a build method was conceived. The principal reason is that it allows application developers to make changes to their code without being concerned with the details of Dockerfiles, or even Docker images. If the image is delivered to a aPaaS (application platform as a service), the individual engineer need not know about Docker at all to contribute to the project! This is very useful in an enterprise environment where there are large numbers of people that have specific areas of expertise and are not directly concerned with the details of the build.

STI

Other Benefits

Once the process is set up, the engineer need only be concerned about the changes they want to make to their source code in order to progress them to different environments.

The advantages of this approach break down into a number of areas:

Flexibility

This process can easily be plugged into any existing software delivery process, and use almost any Docker image as its base layer.

Speed

This method of building can be faster than Dockerfile builds, as any number of complex operations can be added to the build process without creating a new layer at each step. S2I also gives you the capability to re-use artifacts between builds to save time.

Separation of concerns

Since source code and Docker image are cleanly and strongly separated, developers can be concerned with code while infrastructure can be concerned with Docker images and delivery. As the base underlying image is separated from the code, upgrades and patches are more easily delivered.

Security

This process can restrict the operations performed in the build to a specific user, unlike Dockerfiles which allow arbitrary commands to be run as root.

Ecosystem

The structure of this framework allows for a shared ecosystem of image and code separation patterns for easier large-scale operations.

This post is going to show you how to build one such pattern, albeit a simple and somewhat limited one! Our application pattern will consist of:

  •  Source code that contains one shell script
  • A builder that creates an image which takes that shell script, makes it runnable, and runs it

Create Your Own S2I Image

1) Start up an S2I development environment

To help ensure a consistent experience you can use a maintained environment to develop your S2I build image and project.

docker run -ti -v /var/run/docker.sock:/var/run/docker.sock dockerinpractice/shutit-s2i

This command ensures the host’s docker daemon is available within the container through mounting the host’s Docker Unix socket to the container, and uses a maintained sti build environment (the image ‘dockerinpractie/shutit-s2i’)

Problems? SELinux enabled?

If you are running in an selinux-enabled environment, then you may have problems running docker within a container!

2) Create your git project

This could be on built elsewhere and placed on GitHub (for example), but to keep this example simple and self-contained we’re going to create it locally in our S2I development environment. As mentioned above, our source code consists of one shell script. As a trivial example, this simply outputs ‘Hello World’ to the terminal.

mkdir /root/myproject
cd /root/myproject
git init
git config --global user.email "you@example.com"
git config --global user.name "Your Name"
cat > app.sh <<< "echo 'Hello World'"
git add .
git commit -am 'Initial commit'

3) Create the builder image

sti create sti-simple-shell /opt/sti-simple-shell
cd /opt/sti-simple-shell

This S2I command creates several files. To get our workflow working, we’re going to focus on editing just these files:

  • Dockerfile
  • .sti/bin/assemble
  • .sti/bin/run

Taking the Dockerfile first, change its contents to match the following listing:

FROM openshift/base-centos7
RUN chown -R default:default /opt/openshift
COPY ./.sti/bin /usr/local/sti
RUN chmod +x /usr/local/sti/*
USER default

This Dockerfile uses the standard openshift base-centos7 image. This has the ‘default’ user already created within it. It then changes ownership of the default openshift code location to the default user, copies the S2I scripts into the default location for an S2I build, snsures the S2I scripts are executable and makes the builder image use the pre-created ‘default’ user by default.

Next you create the assemble script, which is responsible for taking the source code and compiling it ready to run. Below is a simplified, but feature-complete version of this bash script for you to use.

#!/bin/bash -e
cp -Rf /tmp/src/. ./
chmod +x /opt/openshift/src/app.sh

It runs as a bash script, exiting on any failure (-e), copies the application source into the default directory and builds the application from source. In this case, the ‘build’ is the simple step of making the app.sh file executable.

The ‘run’ script of your S2I build is responsible for running your application. It is the script that the image will run by default:

#!/bin/bash -e
exec /opt/openshift/src/app.sh

Now our builder is ready you run ‘make’ to build your S2I builder image. It will create a Docker image called sti-simple-shell. This image will provide the environment for your final image – the one that includes the software project we made above – to be built. The output of your ‘make’ call should look similar to this:

$ make
 imiell@osboxes:/space/git/sti-simple-shell$ make
 docker build --no-cache -t sti-simple-shell .
 Sending build context to Docker daemon 153.1 kB
 Sending build context to Docker daemon
 Step 0 : FROM openshift/base-centos7
 ---> f20de2f94385
 Step 1 : RUN chown -R default:default /opt/openshift
 ---> Running in f25904e8f204
 ---> 3fb9a927c2f1
 Removing intermediate container f25904e8f204
 Step 2 : COPY ./.sti/bin /usr/local/sti
 ---> c8a73262914e
 Removing intermediate container 93ab040d323e
 Step 3 : RUN chmod +x /usr/local/sti/*
 ---> Running in d71fab9bbae8
 ---> 39e81901d87c
 Removing intermediate container d71fab9bbae8
 Step 4 : USER default
 ---> Running in 5d305966309f
 ---> ca3f5e3edc32
 Removing intermediate container 5d305966309f
 Successfully built ca3f5e3edc32

If you run ‘docker images’ you should now see an image called sti-simple-shell stored locally on your host.

4) Build the Application Image

Looking back at the image at the top of this post, we now have the three things we need for an S2I build in place:

  • Source code
  • A builder image that provides an environment for building and running the source code
  • The sti program

These three are located in one place in this walkthrough, but the only one that needs to be local to our run is the sti program. The builder image can be fetched from a registry, and the source code can be fetched from a git repository such as GitHub.

$ sti build --force-pull=false --loglevel=1 file:///root/myproject sti-simple-shell final-image-1
 I0608 13:02:00.727125 00119 sti.go:112] Building final-image-1
 I0608 13:02:00.843933 00119 sti.go:182] Using assemble from image:///usr/local/sti
 I0608 13:02:00.843961 00119 sti.go:182] Using run from image:///usr/local/sti
 I0608 13:02:00.843976 00119 sti.go:182] Using save-artifacts from image:///usr/local/sti
 I0608 13:02:00.843989 00119 sti.go:120] Clean build will be performed
 I0608 13:02:00.844003 00119 sti.go:130] Building final-image-1
 I0608 13:02:00.844026 00119 sti.go:330] No .sti/environment provided (no evironment file found in application sources)
 I0608 13:02:01.178553 00119 sti.go:388] ---> Installing application source
 I0608 13:02:01.179582 00119 sti.go:388] ---> Building application from source
 I0608 13:02:01.294598 00119 sti.go:216] No .sti/environment provided (no evironment file found in application sources)
 I0608 13:02:01.353449 00119 sti.go:246] Successfully built final-image-1

You can now run your built image, with the source code applied to it:

$ docker run final-image-1
 Hello World

Change and rebuild

It’s easier to see the purpose of this build method now we have a working example. Imagine you are a new developer ready to contribute to the project. You can simply make changes to the git repository and run a simple command to rebuild the image without knowing anything about Docker:

cd /root/myproject
cat > app.sh <<< "echo 'Hello S2I!'"
git commit -am 'new message'
sti build --force-pull=false file:///root/myproject sti-simple-shell final-image-2

Running this image shows the new message we just set in the code:


$ docker run final-image-2
Hello S21!

What Next?

This post demonstrated a simple example, but it’s easy to imagine how this framework could be adapted to your particular requirements. What you end up with is a means for developers to push changes out to other consumers of their software without caring about the details of Docker image production.

Other techniques can be used in combination with this to facilitate DevOps processes. For example, by using git post-commit hooks you can automate the S2I build call on checkin.


RedHat's Docker Build Method – S2I

Currently co-authoring a book on Docker: Get 39% off with the code 39miell

dip

Overview

‘Source To Image’ is a means of creating Docker images by depositing source code into a separately-defined Docker image that is responsible for building the image.

You may be wondering why such a build method was conceived. The principal reason is that it allows application developers to make changes to their code without being concerned with the details of Dockerfiles, or even Docker images. If the image is delivered to a aPaaS (application platform as a service), the individual engineer need not know about Docker at all to contribute to the project! This is very useful in an enterprise environment where there are large numbers of people that have specific areas of expertise and are not directly concerned with the details of the build.

STI

Other Benefits

Once the process is set up, the engineer need only be concerned about the changes they want to make to their source code in order to progress them to different environments.

The advantages of this approach break down into a number of areas:

Flexibility

This process can easily be plugged into any existing software delivery process, and use almost any Docker image as its base layer.

Speed

This method of building can be faster than Dockerfile builds, as any number of complex operations can be added to the build process without creating a new layer at each step. S2I also gives you the capability to re-use artifacts between builds to save time.

Separation of concerns

Since source code and Docker image are cleanly and strongly separated, developers can be concerned with code while infrastructure can be concerned with Docker images and delivery. As the base underlying image is separated from the code, upgrades and patches are more easily delivered.

Security

This process can restrict the operations performed in the build to a specific user, unlike Dockerfiles which allow arbitrary commands to be run as root.

Ecosystem

The structure of this framework allows for a shared ecosystem of image and code separation patterns for easier large-scale operations.

This post is going to show you how to build one such pattern, albeit a simple and somewhat limited one! Our application pattern will consist of:

  •  Source code that contains one shell script
  • A builder that creates an image which takes that shell script, makes it runnable, and runs it

Create Your Own S2I Image

1) Start up an S2I development environment

To help ensure a consistent experience you can use a maintained environment to develop your S2I build image and project.

docker run -ti -v /var/run/docker.sock:/var/run/docker.sock dockerinpractice/shutit-s2i

This command ensures the host’s docker daemon is available within the container through mounting the host’s Docker Unix socket to the container, and uses a maintained sti build environment (the image ‘dockerinpractie/shutit-s2i’)

Problems? SELinux enabled?

If you are running in an selinux-enabled environment, then you may have problems running docker within a container!

2) Create your git project

This could be on built elsewhere and placed on GitHub (for example), but to keep this example simple and self-contained we’re going to create it locally in our S2I development environment. As mentioned above, our source code consists of one shell script. As a trivial example, this simply outputs ‘Hello World’ to the terminal.

mkdir /root/myproject
cd /root/myproject
git init
git config --global user.email "you@example.com"
git config --global user.name "Your Name"
cat > app.sh <<< "echo 'Hello World'"
git add .
git commit -am 'Initial commit'

3) Create the builder image

sti create sti-simple-shell /opt/sti-simple-shell
cd /opt/sti-simple-shell

This S2I command creates several files. To get our workflow working, we’re going to focus on editing just these files:

  • Dockerfile
  • .sti/bin/assemble
  • .sti/bin/run

Taking the Dockerfile first, change its contents to match the following listing:

FROM openshift/base-centos7
RUN chown -R default:default /opt/openshift
COPY ./.sti/bin /usr/local/sti
RUN chmod +x /usr/local/sti/*
USER default

This Dockerfile uses the standard openshift base-centos7 image. This has the ‘default’ user already created within it. It then changes ownership of the default openshift code location to the default user, copies the S2I scripts into the default location for an S2I build, snsures the S2I scripts are executable and makes the builder image use the pre-created ‘default’ user by default.

Next you create the assemble script, which is responsible for taking the source code and compiling it ready to run. Below is a simplified, but feature-complete version of this bash script for you to use.

#!/bin/bash -e
cp -Rf /tmp/src/. ./
chmod +x /opt/openshift/src/app.sh

It runs as a bash script, exiting on any failure (-e), copies the application source into the default directory and builds the application from source. In this case, the ‘build’ is the simple step of making the app.sh file executable.

The ‘run’ script of your S2I build is responsible for running your application. It is the script that the image will run by default:

#!/bin/bash -e
exec /opt/openshift/src/app.sh

Now our builder is ready you run ‘make’ to build your S2I builder image. It will create a Docker image called sti-simple-shell. This image will provide the environment for your final image – the one that includes the software project we made above – to be built. The output of your ‘make’ call should look similar to this:

$ make
 imiell@osboxes:/space/git/sti-simple-shell$ make
 docker build --no-cache -t sti-simple-shell .
 Sending build context to Docker daemon 153.1 kB
 Sending build context to Docker daemon
 Step 0 : FROM openshift/base-centos7
 ---> f20de2f94385
 Step 1 : RUN chown -R default:default /opt/openshift
 ---> Running in f25904e8f204
 ---> 3fb9a927c2f1
 Removing intermediate container f25904e8f204
 Step 2 : COPY ./.sti/bin /usr/local/sti
 ---> c8a73262914e
 Removing intermediate container 93ab040d323e
 Step 3 : RUN chmod +x /usr/local/sti/*
 ---> Running in d71fab9bbae8
 ---> 39e81901d87c
 Removing intermediate container d71fab9bbae8
 Step 4 : USER default
 ---> Running in 5d305966309f
 ---> ca3f5e3edc32
 Removing intermediate container 5d305966309f
 Successfully built ca3f5e3edc32

If you run ‘docker images’ you should now see an image called sti-simple-shell stored locally on your host.

4) Build the Application Image

Looking back at the image at the top of this post, we now have the three things we need for an S2I build in place:

  • Source code
  • A builder image that provides an environment for building and running the source code
  • The sti program

These three are located in one place in this walkthrough, but the only one that needs to be local to our run is the sti program. The builder image can be fetched from a registry, and the source code can be fetched from a git repository such as GitHub.

$ sti build --force-pull=false --loglevel=1 file:///root/myproject sti-simple-shell final-image-1
 I0608 13:02:00.727125 00119 sti.go:112] Building final-image-1
 I0608 13:02:00.843933 00119 sti.go:182] Using assemble from image:///usr/local/sti
 I0608 13:02:00.843961 00119 sti.go:182] Using run from image:///usr/local/sti
 I0608 13:02:00.843976 00119 sti.go:182] Using save-artifacts from image:///usr/local/sti
 I0608 13:02:00.843989 00119 sti.go:120] Clean build will be performed
 I0608 13:02:00.844003 00119 sti.go:130] Building final-image-1
 I0608 13:02:00.844026 00119 sti.go:330] No .sti/environment provided (no evironment file found in application sources)
 I0608 13:02:01.178553 00119 sti.go:388] ---> Installing application source
 I0608 13:02:01.179582 00119 sti.go:388] ---> Building application from source
 I0608 13:02:01.294598 00119 sti.go:216] No .sti/environment provided (no evironment file found in application sources)
 I0608 13:02:01.353449 00119 sti.go:246] Successfully built final-image-1

You can now run your built image, with the source code applied to it:

$ docker run final-image-1
 Hello World

Change and rebuild

It’s easier to see the purpose of this build method now we have a working example. Imagine you are a new developer ready to contribute to the project. You can simply make changes to the git repository and run a simple command to rebuild the image without knowing anything about Docker:

cd /root/myproject
cat > app.sh <<< "echo 'Hello S2I!'"
git commit -am 'new message'
sti build --force-pull=false file:///root/myproject sti-simple-shell final-image-2

Running this image shows the new message we just set in the code:


$ docker run final-image-2
Hello S21!

What Next?

This post demonstrated a simple example, but it’s easy to imagine how this framework could be adapted to your particular requirements. What you end up with is a means for developers to push changes out to other consumers of their software without caring about the details of Docker image production.

Other techniques can be used in combination with this to facilitate DevOps processes. For example, by using git post-commit hooks you can automate the S2I build call on checkin.


Bash Shortcuts Gem

Currently co-authoring a book on Docker: Get 39% off with the code 39miell

dip

TL;DR

These commands can tell you what key bindings you have in your bash shell by default.

bind -P | grep 'can be'
stty -a | grep ' = ..;'

Background

I’d aways wondered what key strokes did what in bash – I’d picked up some well-known ones (CTRL-r, CTRL-v, CTRL-d etc) from bugging people when I saw them being used, but always wondered whether there was a list of these I could easily get and comprehend. I found some, but always forgot where it was when I needed them, and couldn’t remember many of them anyway.

Then debugging a problem tab completion in ‘here’ documents, I stumbled across bind.

bind and stty

‘bind’ is a bash builtin, which means it’s not a program like awk or grep, but is picked up and handled by the bash program itself.

It manages the various key bindings in the bash shell, covering everything from autocomplete to transposing two characters on the command line. You can read all about it in the bash man page (in the builtins section, near the end).

Bind is not responsible for all the key bindings in your shell – running the stty will show the ones that apply to the terminal:

stty -a | grep ' = ..;'

These take precedence and can be confusing if you’ve tried to bind the same thing in your shell! Further confusion is caused by the fact that ‘^D’ means ‘CTRL and d pressed together whereas in bind output, it would be ‘C-d’.

edit: am indebted to joepvd from hackernews for this beauty

    $ stty -a | awk 'BEGIN{RS="[;n]+ ?"}; /= ..$/'
    intr = ^C
    quit = ^
    erase = ^?
    kill = ^U
    eof = ^D
    swtch = ^Z
    susp = ^Z
    rprnt = ^R
    werase = ^W
    lnext = ^V
    flush = ^O


Breaking Down the Command

bind -P | grep can

Can be considered (almost) equivalent to a more instructive command:

bind -l | sed 's/.*/bind -q /' | /bin/bash 2>&1 | grep -v warning: | grep can

‘bind -l’ lists all the available keystroke functions. For example, ‘complete’ is the auto-complete function normally triggered by hitting ‘tab’ twice. The output of this is passed to a sed command which passes each function name to ‘bind -q’, which queries the bindings.

sed 's/.*/bind -q /'

The output of this is passed for running into /bin/bash.

/bin/bash 2>&1 | grep -v warning: | grep 'can be'

Note that this invocation of bash means that locally-set bindings will revert to the default bash ones for the output.

The ‘2>&1’ puts the error output (the warnings) to the same output channel, filtering out warnings with a ‘grep -v’ and then filtering on output that describes how to trigger the function.

In the output of bind -q, ‘C-‘ means ‘the ctrl key and’. So ‘C-c’ is the normal. Similarly, ‘t’ means ‘escape’, so ‘tt’ means ‘autocomplete’, and ‘e’ means escape:

$ bind -q complete
complete can be invoked via "C-i", "ee".

and is also bound to ‘C-i’ (though on my machine I appear to need to press it twice – not sure why).

Add to bashrc

I added this alias as ‘binds’ in my bashrc so I could easily get hold of this list in the future.

alias binds="bind -P | grep 'can be'"

Now whenever I forget a binding, I type ‘binds’, and have a read :)

[adinserter block=”1″]


The Zinger

Browsing through the bash manual, I noticed that an option to bind enables binding to

-x keyseq:shell-command

So now all I need to remember is one shortcut to get my list (CTRL-x, then CTRL-o):

bind -x '"C-xC-o":bind -P | grep can'

Of course, you can bind to a single key if you want, and any command you want. You could also use this for practical jokes on your colleagues…

Now I’m going to sort through my history to see what I type most often :)

This post is based on material from Docker in Practice, available on Manning’s Early Access Program. Get 39% off with the code: 39miell

dip

A CoreOS Cluster in Two Minutes With Four Commands

A CoreOS Cluster in Two Minutes With Four Commands

[adinserter block=”1″]

You may have heard about CoreOS, be wondering what all the fuss is about and want to play with it.

If you have a machine with over 3G memory to spare, then you can be delivered a shell on a CoreOS cluster in under two minutes with four commands. Here they are:

sudo pip install shutit
git clone https://github.com/ianmiell/shutit-coreos-vagrant
cd shutit-coreos-vagrant
./coreos.sh

It uses ShutIt to automate the stand-up. The script is here.

See it in action here:


What Next?

Now get going with CoreOS’s quickstart guide

Didn’t Work?

More likely my fault than yours. Message me on twitter if you have problems: @ianmiell

This post is based on material from Docker in Practice, available on Manning’s Early Access Program. Get 39% off with the code: 39miell

dip